
This article reviews the TP-Link TL-MR100 router to see its features, its performance, and overall usefulness.
Internet connectivity is indispensable; it is a necessity. Whether you are a passionate gamer, you require internet connectivity for work, an avid streamer, or you want to stay connected with your loved ones, and maybe monitor your security camera systems, internet connectivity is needed.
The TP-Link TL-MR100 router is featured here, as the brand is well-known in networking solutions. The TP-Link TL-MR100 is a mid-range 300 Mbps, Wireless N, 4G LTE Router. It is designed with features that should ensure you get uninterrupted, and reliable internet connectivity. Our review of the device will bring out its features, show you its performance, and in the end, you will be able to decide if it is a device you would want to use.
Let’s get started.
Overview of the TP-Link TL-MR100 Router
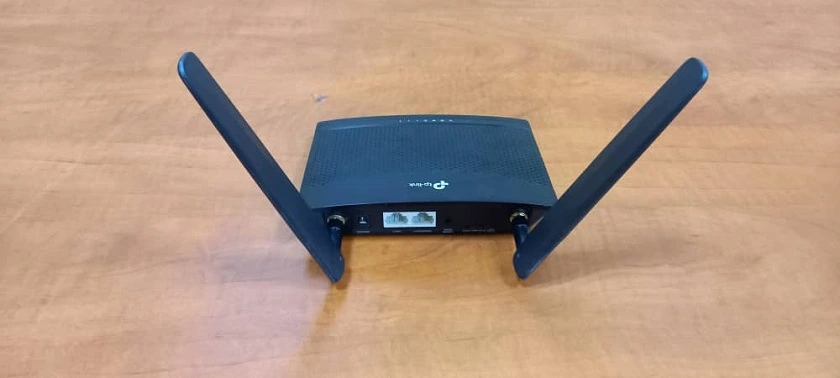
The TP-Link TL-MR100 router is in a very attractive all-black finish. At the top, you will observe very tiny holes all around that aid ventilation. Then, it is designed with two detachable LTE antennas to enable stable and efficient connections. Taking a quick look at the back of the device, from left to right, you have a Power Port (rated 9V/0.85A), then a LAN Port (LAN 1, 10/100 Mbps), another LAN Port (LAN 2, 10/100 Mbps WAN+ and LAN), a WPS/RESET Button, and a SIM Card Slot.

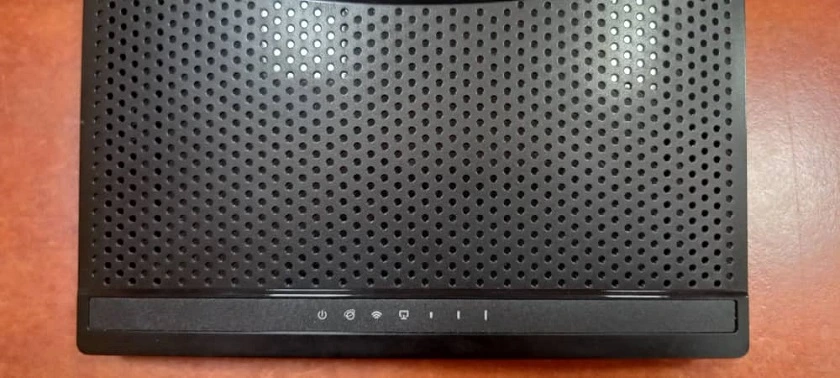
On the front of the TP-Link TL-MR100, you find seven icons that light up to indicate different things. First is the Power icon; this comes ON when the device is plugged into your power supply and stays ON. The second icon indicates the presence and absence of a SIM card. Thirdly, you have a Wi-Fi icon, then a LAN icon which indicates if any device like a PC is connected via an Ethernet cable. The remaining three icons are bars that indicate how strong or poor the signal reception from your SIM card provider is.
If you look under the TP-Link TL-MR100 router, you will observe two hooks that enable you hang the device horizontally on your wall. You can also simply place the device on a flat surface as you desire. It is worth mentioning that the device is an ideal companion for people that are always on the move as it is very lightweight and will fit easily in a backpack or carry-on luggage. It weighs 150g and its dimensions (W x D x H) are 6.06×4.49×1.42 in (154×114×36 mm). The storage temperature of the TP-Link TL-MR100 router is between -40℃~70℃ (-40℉ ~158℉) and its operating temperature is between 0℃~40℃ (32℉ ~104℉).
When you receive the device, you will find a D.C adapter with an input voltage rating of 100-240 Volts (50/60Hz, 0.3 Amps). Its output voltage is 9 Volts, 0.85 Amps, and 7.65 Watts. Then you have included, an RJ45 to RJ45 Ethernet cable, a quick installation guide, and the TP-Link TL-MR100 router.
How to Set up the TP-Link TL-MR100 Router
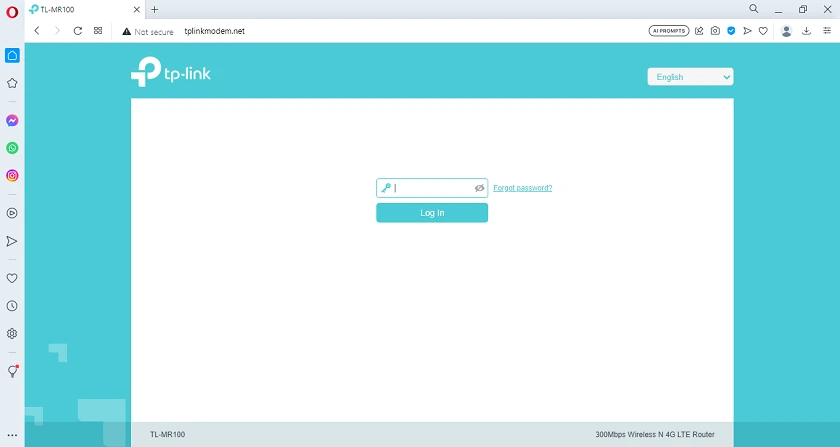
Setting up the device is pretty straightforward. Depending on where you choose to place it, ensure you have a power socket close by. Firstly, insert your micro SIM card into the SIM slot. Then connect the D.C adapter to the TP-Link TL-MR100 and plug the adapter into your power socket. The device will boot up, and as mentioned in the overview of the TL-MR100, each icon on the device will light up to indicate what’s functional, and what is not. On successful boot-up, you should now see the default SSID of the TP-Link TL-MR100 from your mobile phone or PC. Simply go ahead and connect to it as you will find the password under the TP-Link TL-MR100. After successfully connecting to the router, you are good to go surfing the internet. At this point also, you can Log into the TP-Link TL-MR100 router and configure it as you may want. To do this, simply go to the TP-Link URL, which we weren’t pleased with, as it only accepted HTTP and not HTTPS. So, you would observe a message from your browser saying this connection is not secure as shown below.
After the initial setup stages, you should then give your router a strong Login Password. Then go ahead to Log in and you will be presented with the page that’s shown below.
Features of the TP-Link TL-MR100 Router
The TP-Link TL-MR100 router is designed with a number of features to provide you with easy usability, efficient network connectivity, reliable performance, security, and scalability if you choose to connect it to other network equipment. This device uses 4G LTE Technology to deliver download speeds of up to 150 Mbps and upload speeds of up to 50 Mbps. Then, it shares Wi-Fi network connections on 2.4GHz, at a maximum speed of 300Mbps.
To see the entire features of the TP-Link TL-MR100, simply click on Advanced on the Graphical User Interface. Then you find Status, Operation Mode, SMS, Wireless, Guest Network, NAT Forwarding, Parental Controls, Security, and System Tools.
(1) Status
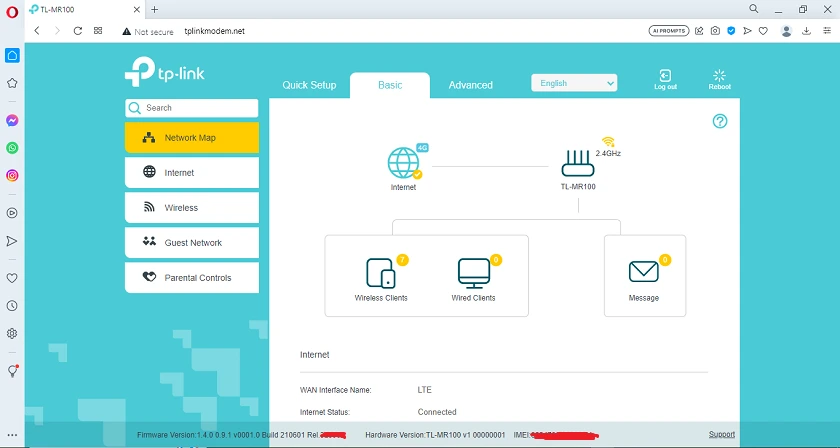
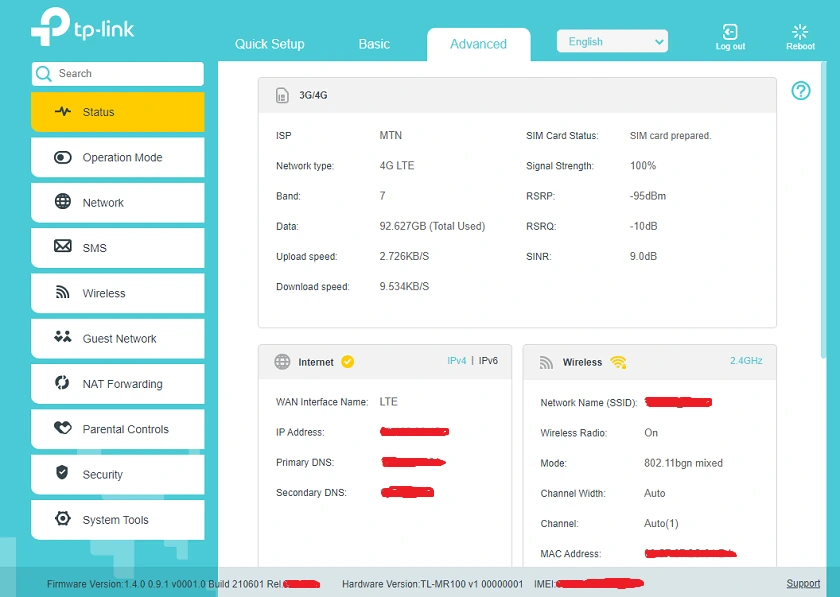
Status is the first Tab on the left-hand side of the Graphical User Interface. Here you find the type of connections you have which include 3G/4G, Internet Protocols (IPv4 and IPv6), Wireless (2.4GHz), LAN, and Guest Network. These all show every detail of your network connections and enable you to have a quick overview of what’s currently functional and the status of your TP-Link TL-MR100.
(2) Operation Mode
In this Tab, you will find the option to set the TP-Link TL-MR100 to a 3G/4G Router only, or set it to a Wireless Router only.
(3) Network
This Tab has the core functions of the TL-MR100. Here you find Internet Settings, ISP Upgrade Settings, PIN Management, Data Settings, LAN Settings, Dynamic DNS, Static Routing, and IPv6 Tunnel. If you are not very familiar with Networking, you can simply leave the default settings you find in the Network Tab as they are. But we will explain them.
Under the Internet section, you will be able to turn OFF/ON your Mobile Data, Data Roaming, and NAT (Network Address Translation). You will also find options to choose 4G Preferred, 4G Only, or 3G Only. Lastly in this section, you have Dial-up Settings that show you Network Search (Automatic or Manual), Profile Name, PDP Type (IPv4, IPv6 or Both), APN Type (Static or Dynamic), APN URL, Username, Password, and Authentication Type.
The next section under Network is the ISP Upgrade section. Here, you will see your Current ISP Version, and an option to upload a New ISP File. If you have an upgrade file, you can simply upload it, and click on Upgrade to perform an ISP Upgrade. The next section you have is PIN Management. With this option, you can simply activate PIN Lock. Then you have Data Settings. Here, you will find the option to activate Data Limit and Monthly Data Statistics for your SIM card.
Next, you have LAN Settings. This gives you access to the DHCP Server configurations on the TP-Link TL-MR100 router. You will find MAC Addresses, IP Addresses, the entire Pool, the option to set IGMP Snooping, and all the gadgets that are connected to the router with their Host Names and how long they’ve been connected.
Moving further under Network, you have Dynamic DNS that shows you Dyndns, NO-IP, and Go to register. You will also see a Username Field, Password, and Domain Name Field. Static Routing and IPv6 Tunnel are the remaining options under Network. With these, you can choose to put in a Static Route in your TP-Link TL-MR100, and IP Version 6 IP Addresses.
(4) SMS
This Tab provides you with options to manage your inserted SIM card. You have Inbox, New Message, Outbox, Drafts, and SMS Settings.
(5) Wireless
Under this Tab, you find Wireless Settings, WPS, Wireless Schedule, Statistics, and Advanced Settings. Now, Wireless Settings shows you the Default TP-Link SSID that was preconfigured for your TP-Link TL-MR100 router. You can choose to hide the SSID, change the security between WPA/WPA2 Personal, WPA/WPA2 Enterprise, WEP, and No Security.
You will also find the option for Encryption (Auto, TKIP, AES); the default is AES. Then you can change the Password of this default SSID that was preconfigured for your TP-Link TL-MR100, change the Wireless Standards between 802.11b/g/n Mixed, 802.11n Only, and 802.11g/n Mixed. In addition, you can set the Channel to Auto, or between 1 to 13. The Channel Width can also be changed from Auto to 20MHz, or 40MHz. The last option is the Transmit Power option, that you can change from Low to Middle to High.
WPS is the next section under Wireless. You have two options for WPS; simply tapping on the WPS Button you see on the screen is option one. The second is with a PIN; The router’s PIN or Client’s PIN. The next section after WPS is WPS Schedule, where you can simply turn ON or OFF your wireless signal at specific times.
Next, you have Statistics. This will show you all gadgets that are connected to your TP-Link TL-MR100 via Wireless. You will see their MAC Addresses, Connection Types, Security, Received Packets, and Sent Packets.
The final section under wireless is Advanced Settings. This gives you options to edit Beacon Intervals, RTS Thresholds, DTM Intervals, Group Key Update Period, WMM, Short GI, AP Isolation, and WPS.
(6) Guest Network
This is a separate SSID that you can turn ON for those that you do not want to connect to your Primary SSID. You will find options to ”Allow Guests to Access Each Other” and ”Allow Guests to Access My Local Network”. If you enable Guest Network on your TP-Link TL-MR100, you can Rename the Default Guest SSID to your choice, choose the Security you want, change the Password, or even Hide the SSID.
(7) NAT Forwarding
Under Network Address Translation Forwarding, you will find ALG, Virtual Servers, Port Tagging, DMZ, and UPnP. As mentioned earlier, if you are not familiar with Networking, simply leave these settings as they work well with their Default Settings. However, under ALG you have PPTP Pass-Through, L2TP Pass-Through, IPSec Pass-Through, FTP ALG, TFTP ALG, H323 ALG, SIP ALG, and RTSP ALG.
Under Virtual Servers, you have the option to Add or Delete as you choose. This also goes for Port Tagging. Under DMZ, you can enable and add a DMZ Host IP Address to your TP-Link TL-MR100 router. Under UPnP, you will find it already enabled, and any UPnP Service List will be displayed.
(8) Parental Controls
This is an option that you can turn ON so as to prevent your kids from accessing harmful websites. You can also configure the times that they should surf the internet, or simply Pause the Internet on your TP-Link TL-MR100 router.

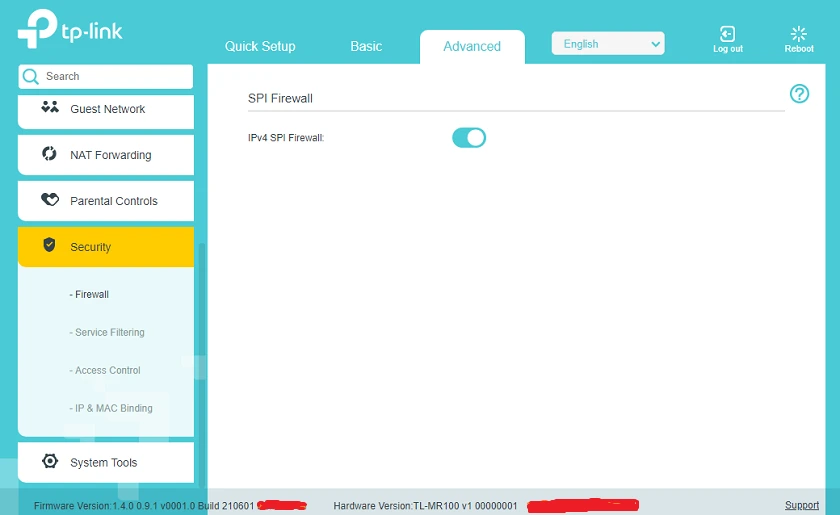
(9) Security
This is a very core area of the TP-Link TL-MR100 router. Here, you find Firewall, Service Filtering, Access Control, and IP & MAC Filtering. Under Firewall, you have the option to Enable or Disable IPv4 SPI Firewall. Under Service Filtering, you can simply tap on Enable, then Add or Delete as you choose.
Access Control gives you the power to give access to a gadget (Whitelist) or disable (Blacklist) that device from your TP-Link TL-MR100. If you blacklist a device, even if the password to your TP-Link TL-MR100 is inputted, the router will never allow that device connectivity. In this section, you will also see all connected devices, their IP Addresses, MAC Addresses, Connection Type, and those that have been blacklisted.
Under IP & MAC Binding, you have the option to turn this ON or OFF. You will also see all connected gadgets, and be able to perform IP Address and MAC Address Binding.
(10) System Tools
This is the last Tab on the left-hand side of the Graphical User Interface. It gives you options to manage your TP-Link TL-MR100. You get to see Time Settings, LED Control, Diagnostics, Firmware Upgrade, Backup & Restore, Reboot, Administration, and System Logs.
Under Time Settings, you will find the current time of your TP-Link TL-MR100, the Time Zone, Date, options for you to enter two NTP Servers, the option to Get from PC, and the option to Get from the Internet. In addition, you can enable Daylight Saving Time.
LED Control is the next. With this, you can set all the lights in the icons on the front of the TP-Link TL-MR100 router to go OFF at the particular time you want. This could be at nighttime, and when that time is reached, all the LEDs go OFF. Do ensure to set the time on your TP-Link TL-MR100 to the correct time before you enable this setting.
Under Diagnostics, you can simply click on Start and the device will perform a diagnostics check. Under Firmware Update, you can simply use this to upgrade the firmware of your TP-Link TL-MR100 router. You can perform an Online Upgrade or an Offline Upgrade where you have to download the particular firmware to your local PC. Also, this page will show if your current firmware is up-to-date or not.
Backup and Restore enables you to save the current state of your TP-Link TL-MR100 router so that in the event of a device failure, you can simply restore it back to the perfectly working configuration.
With the Reboot option, you can perform a Manual Reboot instantly, or create a Schedule for the router to always reboot at a particular time. Then you have Administration, which shows you Account Management, and here you can change the Login Password to your TP-Link TL-MR100. You also have Local Management which enables you see the Port for HTTP, and Allow only a particular IP Address in managing the device. There is also the option to manage the router Remotely. You can enable this, set a Port Number, set an IP Address, set a Client Device, and allow Remote or only Local ICMP Pings. The last option under System Tools is System Logs. Clicking on this will show you all logs that are collected by your TP-Link TL-MR100 router. These include the Type of Log (ALL, 4G, DHCPD, HTTPD, and SYSTEM) and the Level (Emergency, Alert, Critical, Error, Warning, Notice, Information, and Debug).
How does the Router Perform?
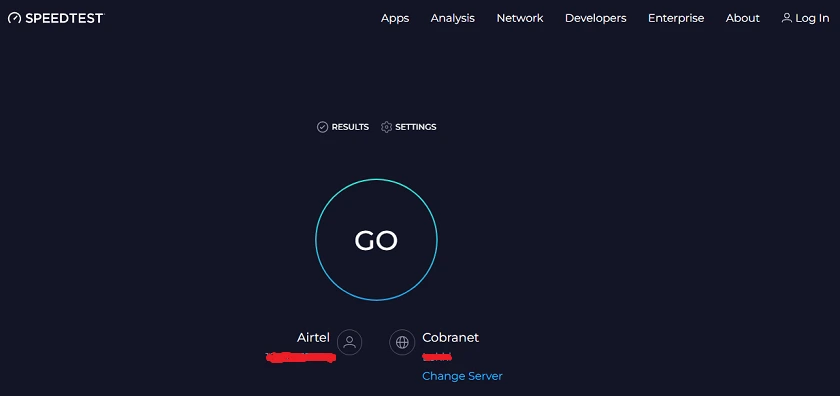
Using the Network Performance testing platform speedtest.net and two LTE Mobile Carriers MTN and Airtel, we simulated Download and Upload Speeds, and the results weren’t fantastic.
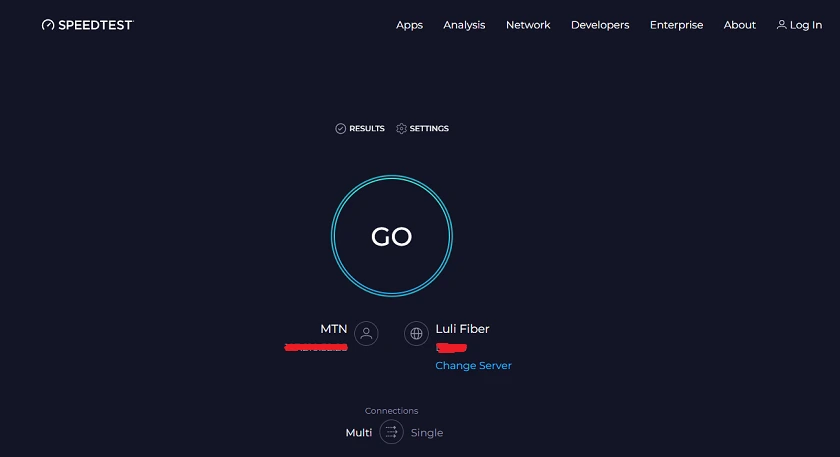
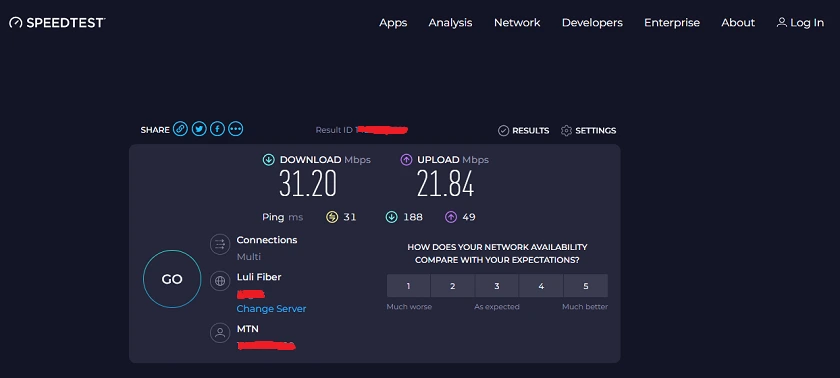
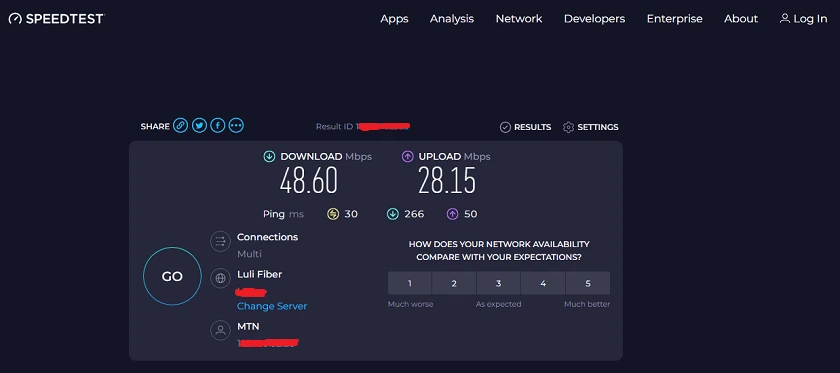

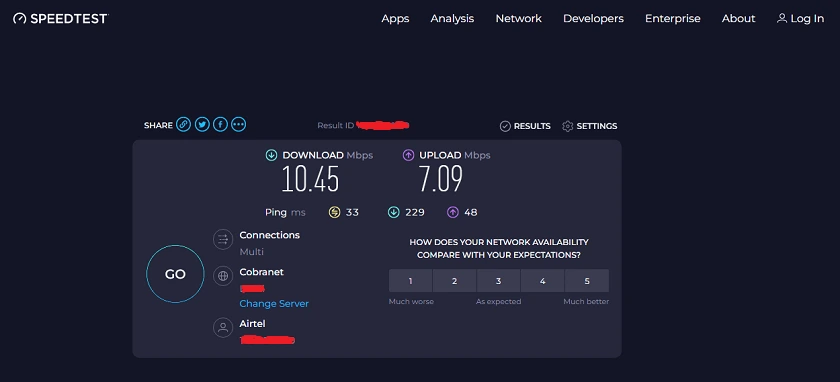
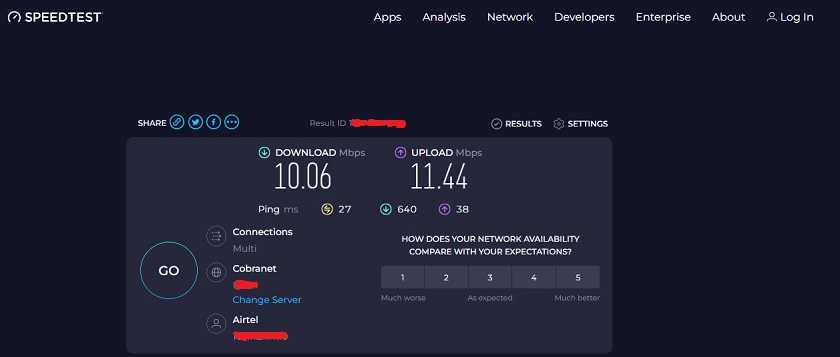
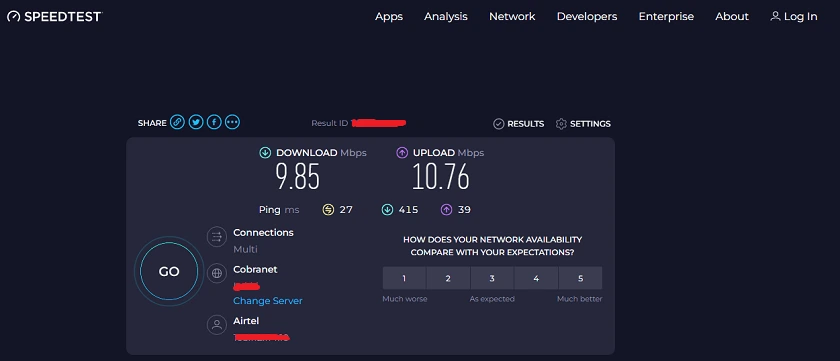
However, different factors affect results; your results may be different, just as your browsing experience.
Final Thoughts
The TP-Link TL-MR100 router does have its highs and lows. As with every gadget, it may be suitable for some and not for others. A lot of security features are built into this router to ensure the safety of your data and privacy. Also, features that protect against unauthorized access along with a Guest Wi-Fi network. If you are looking for a budget-friendly router, with advanced security features, portability, and reliability, the TL-MR100 can be a good fit for you.
Get it on the Alibaba Official Website (Cashback Reward Available)
This is the most comprehensive review of the TP-Link MR100 that I have found. Great Job!
Very well explained.
Thanks.
Thanks.