
This Sucuri Review is designed to explore the features and capabilities of Sucuri Website Security and how it could be a fortress for your online presence.
Firstly, website security is a paramount concern for any website owner, blogger, online entrepreneur, business, et cetera, and in the ever-evolving landscape of the digital world, online assets are prime targets for a myriad of cyber attacks.
Sucuri as a brand is well known in the Cybersecurity space, and as the battle between malicious actors and security measures intensifies, Sucuri Website Security can be what you desire. As we look into the comprehensive suite of security features offered by the brand, we will give you our first-hand experience with Sucuri Security. You will get to see the layers of defense the Sucuri Website Security provides, how you can benefit from them, and how you can get started.
Overview of the Sucuri Website Security Service
Today, there are several Content Management Systems used to set up websites that serve as digital storefronts for business enterprises, or just platforms for personal expression. Among the several Content Management Systems available for websites, WordPress is arguably a dominant platform and there are several website security services out there that are tailored just for securing websites on the WordPress platform. This is not the case with Sucuri Website Security, it is designed for all platforms and custom sites.
How to Set up Sucuri for your Website Security
Firstly, the Sucuri Security Solution gives you the opportunity to test the service before actually paying for it. This is a very great way to use the service, understand it, and be more confident with it before actually committing financially.
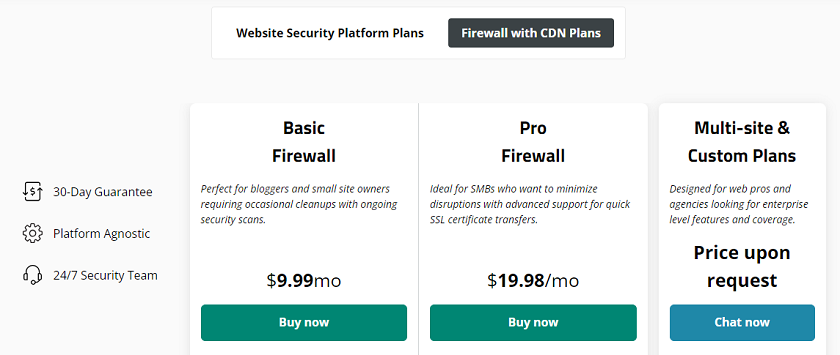
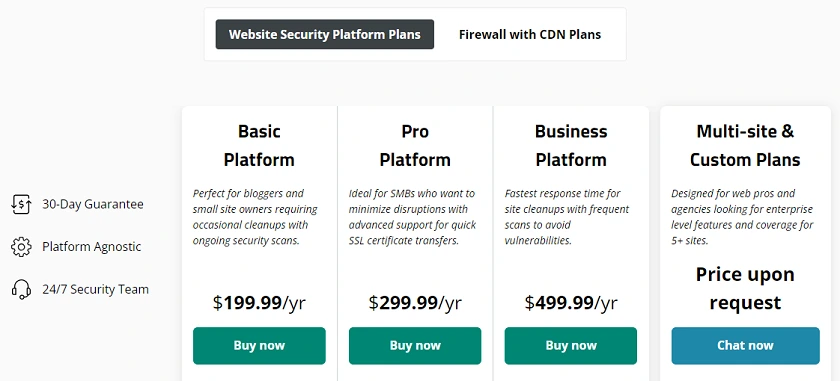
So, Sucuri Security gives you a 30-Day Free Trial for both the Basic and Professional Plans. After the Free Trial Period, you can decide to begin to pay Monthly at $9.99 for the Basic Plan or $19.98 Monthly for the Professional Plan. In addition, you can go with the Yearly Plans that come in the Basic, Pro, Business, Multi-site & Custom Plans as shown below.
Having said these, to get started with Sucuri Security, simply select any of the Free Trial Plans and Signup. Once you confirm your email address, you will be taken to the Sucuri Security Dashboard. The next steps would be for you to Add Your Website and Activate the Sucuri Firewall. Simply follow the prompts on your screen and you will be done in no time. Then also, after activating the Sucuri Firewall, you will then be given an IP Address that you must now use to point your website’s traffic through the Firewall. To do this, you would have to put this IP Address in your Doman Registrar. For example, if you are using Namecheap, simply log into your account and click on Domain List. If you have multiple domains registered here, simply click on the one you are integrating with Sucuri Security, and then click on Advanced DNS. You will find the A Record and CNAME Record as shown below. On the A Record entry, all you have to do is select the IP Address you have there, edit/change it to the IP Address you got from Sucuri Security and Save it. Do not do anything on the CNAME Record.
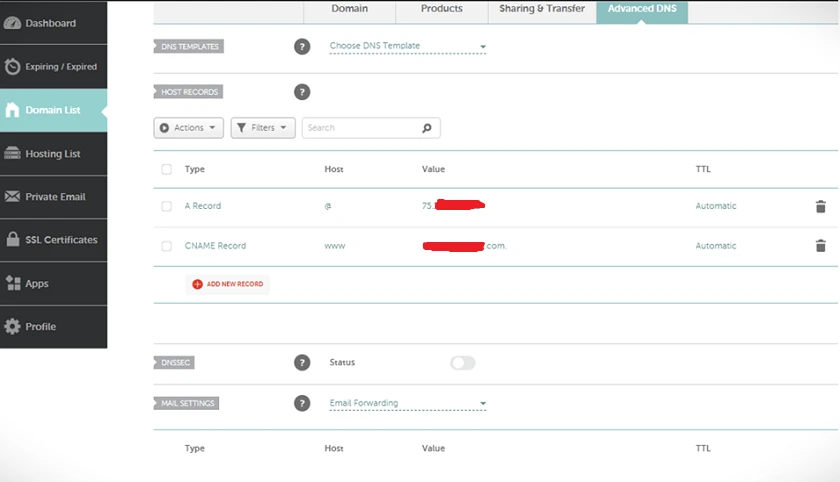
Once these steps are completed, go back to your Sucuri Security Dashboard and refresh the page; you will then see a message at the top ”Service is Activated” and the IP Address you just inserted in your Domain Registrar.
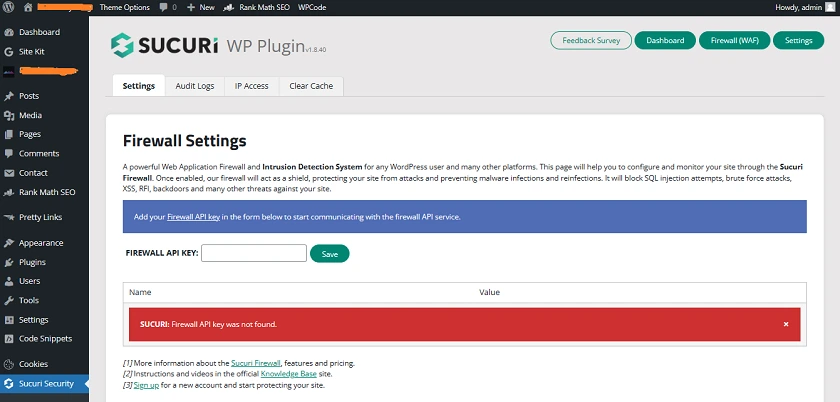
It is also worth mentioning that for those who use WordPress, there is the Sucuri WordPress Plugin. Now, if you decide to simply go ahead to install the plugin and activate it, you would still be required to create an account just like the preceding steps, and generate an API Key. For those who might need more explanation on this, simply log in as an Admin in your WordPress Dashboard, and at the top right corner, search for the Sucuri WordPress Plugin by just typing Sucuri as shown below.

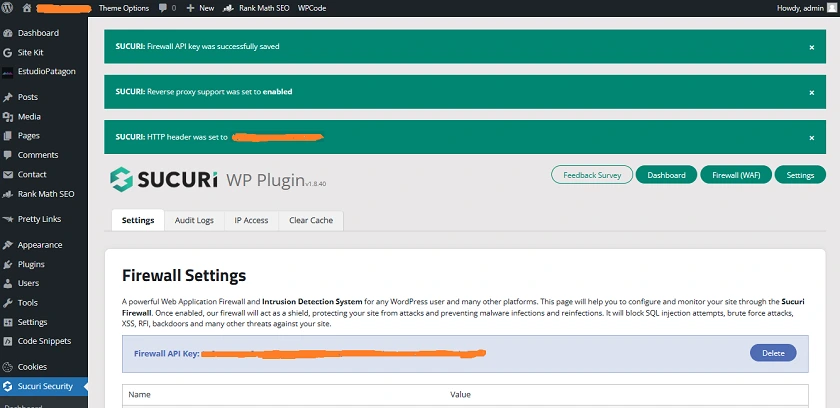
The Sucuri WordPress Plugin will pop out. Click on Install Now and afterwards, Click on Activate. After the activation, you will see as shown in the next screenshot below, where you are asked to Add your Firewall API Key. Click on this and you will be taken to the Sucuri Security homepage. After completing the required steps, you will be presented with three API Keys. Copy the first one (API Key for plugin) and paste it in the box as shown in the screenshot below, showing FIREWALL API KEY, and click on the save button.
Features and Performance of Sucuri Security
Firstly, Sucuri Security provides a range of robust features to enhance website security and protect against various online threats. The feature sets are top-notch and nothing short of our expectations so far. These features include a Firewall, Malware Scanning and Removal, Security Monitoring, DDoS Protection, Website Blacklist Removal, SSL Certificate Support, Security Hardening, a Content Delivery Network (CDN), Caching, Audit Trails, Access Control, Reports, Incident Response and Customer Support, Log Retention and Analysis, Support for all CMS Platforms, Website Backups, and so on.
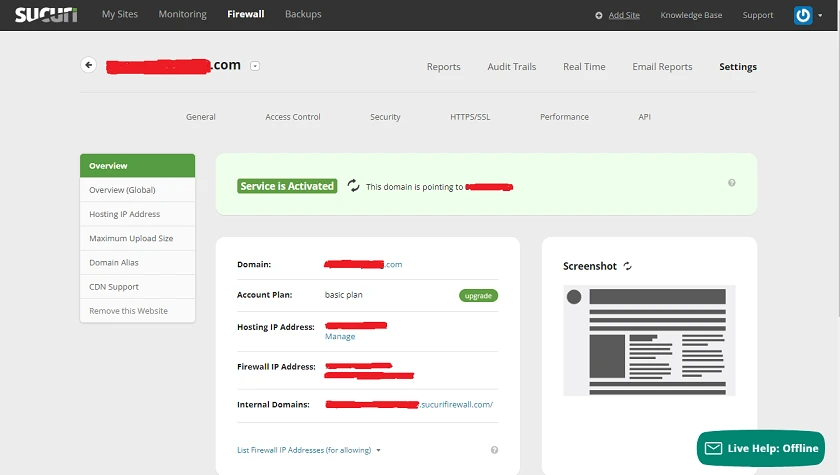
Looking at the Sucuri Security Dashboard above, at the very top you have My Sites. If you click on this, it shows you the website or websites that you have integrated into the Sucuri Security Solution. Next, you have the Monitoring Tab which gives you an overview of security events. Firewall is the next Tab you find and this is the heart of the Sucuri Security Solution. We will explain this much later in this teaching.
Moving on to the Backups Tab, this gives you the option to take backups of your website. You have up to 100GB of storage, Daily, Weekly, and Monthly frequency options, File Change History, Automatic Restore, and File Downloads. The next Tab is the Add Site where you can add another website to your Sucuri Security Solution. The Knowledge Base Tab takes you to a repository of articles to help you with the Sucuri Website Security Solution. Then, the Support Tab takes you to the Sucuri Customer Support Team. The last option is a button that shows you your Sucuri Account, APIs, and your Sucuri Firewall Plan.
Next, the Reports Tab will show you Blocked Attacks, the Period, Visitors to your site, Browsers used, Devices, Response Codes, Page Caching Status, HTTPS Versions, Average Traffic Per Hour, and Traffic by Country.
The Audit Trails Tab takes you to Blocked Requests to your site and Allowed Requests. The Real Time Tab shows you all requests and you can then filter by Allowed and Blocked. Email Reports will show you the email addresses that have been set in the Sucuri Security Service to receive alert notifications, and you can edit or add more here. You can also customize the report frequency by Day, Week, Month, and Format options which are PDF, CSV, and HTML. The Settings Tab takes you to all the settings you can change for your Sucuri Security Solution and Sucuri Website Firewall.
Next, the General Tab shows you what you are seeing right now in the picture above. Access Control shows you the current IP Address of the device with which you are viewing this Sucuri Security Dashboard. You also have the option to Allow other IP Addresses permanently, or 30 Minutes, 1 Hour, 3 Hours, 6 Hours, 12 Hours, or 1 Day.
The Security Tab is next, and this takes you to Advanced Security Options, Allowed HTTP Methods, Additional Headers, Security Levels, and the option to set ”Prevent Firewall Bypass”. The HTTP/SSL Tab shows you the current state of your Certificate(s), the option to upload your own Certificate(s), SSL Mode, and Protocol Redirection.
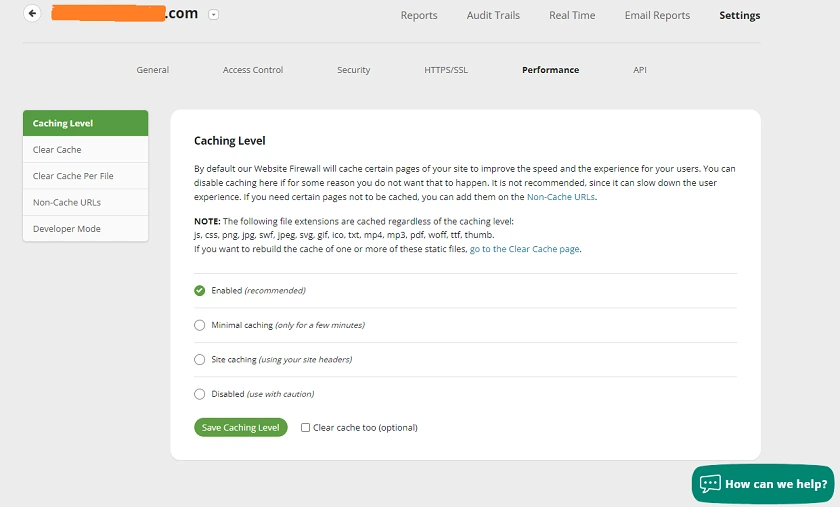
Under the Performance Tab, you will find Caching Settings. You can manage these by Cache Level, Clear Cache, Clear Cache Per File, Non-Cache URLs, and Developer Mode. The API Tab shows all API Keys for your Domain and options for you to manage it.
The Sucuri Website Firewall
This is a critical component designed to deliver very robust protection for your websites against a wide range of online threats. It functions in real-time, identifying and blocking malicious traffic before it gets to your Server. With this, potential attacks like brute force, cross-site scripting, SQL injections, et cetera, are dealt with.
Virtual Patching is another feature of the Sucuri Website Firewall. This helps to take care of vulnerabilities in Plugins or Applications particularly when official patches and updates have not been immediately applied.
Behavioral Analysis is another capability of the Firewall. It performs this to understand patterns in the usage of legitimate users. If there are variations to these patterns, unauthorized users are instantly blocked, and as an Administrator, you are instantly notified.
Distributed Denial of Service (DDoS) is a very destructive process whereby hackers flood a website with traffic so as to overwhelm, cause disruptions, and bring it down. But with the Sucuri Security Web Application Firewall, DDoS attacks are mitigated. The Firewall is able to absorb and neutralize these types of attacks sufficiently.
Geo Blocking is also available with the Sucuri Security Web Application Firewall. As the owner or the Administrator of a website, this allows you to set Geographic Blocking Rules. This additional layer of control and security enables you to prevent access to your website from any region or country as shown below.

In addition to Geographic Blocking, you can also Allow IP Addresses, Block IP Addresses, Allow URL Paths, Block URL Paths, Block User-Agents, Block HTTP Cookies, Block HTTP Referers, and configure Protected Pages.
Customizable Security Rules are policies that you can set according to your own specific security requirements for your website. So, with the Sucuri Website Firewall, you can configure this and the Firewall will be optimized for the website’s specific security needs.
HTTPS, SSL, and CDN Support are provided with the Sucuri Security Solution, and once your site is integrated into the Sucuri Security Solution, this forces all your website’s traffic through secure connections, with CDN performance optimization, which builds trust and confidentiality for your site’s visitors. In addition, from within your Sucuri Security Dashboard, you can Manage Caching Settings, and Caching is enabled by default. So, you can Clear Cache, Clear Cache Per File, Non-Cache URLs, and configure Developer Mode to add trusted IP addresses that will bypass all cache, including static files.
Continuous Monitoring and Incident Response are exceptional features of the Sucuri Website Firewall that you would find extremely beneficial. Firstly, the Firewall is incorporated with Sucuri Site Checker Scanner. This checker automatically scans your website for malware, malicious codes, suspicious files, changes in your website’s core files, and even changes to WHOIS information and DNS. In addition, a record of Blacklisted Websites are kept by Search Engines like Google and used to warn visitors when they go to any of these Blacklisted URLs. Now, the Sucuri Site Checker Scanner is capable of checking your website if it has been Blacklisted, notifies you of the result, and ways with which you can remedy the situation.
Log Analysis and Reporting is a vital feature for any security solution. With the Sucuri Website Firewall, you get to see detailed logs of security events and incidents. As an Administrator of the site, you can then take these logs and look at them critically to gain insights into the type of threats, any patterns that may have been established, and to guide you into the formulation of more effective security policies.
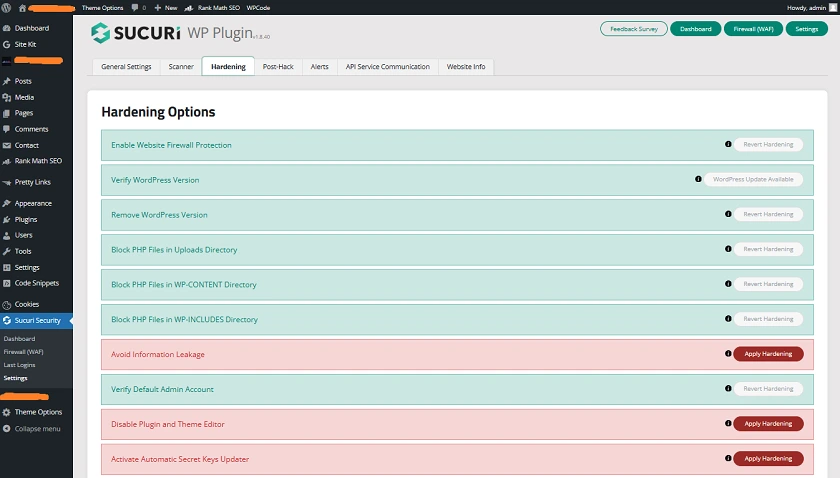
1-Click Hardening and Malware Cleanup are two different services that you can take advantage of. Firstly, if your website is on the WordPress platform, from the Sucuri WordPress Plugin, you can instantly harden your WordPress files and installation as shown below.
Then, the Malware Cleanup is a specialized service provided by Sucuri Security Analysts. If you are or you are not using Sucuri Security and you have an emergency, their Team is available to help recover and restore your website while also giving you a 30-day money-back guarantee. If you need this service, you can get it right here.
Sucuri Customer Support
It is worth mentioning that the Sucuri Customer Support is top-notch. We say this because from our interaction with them, they proved sufficiently empathic and knowledgeable in resolving our issues. On one occasion, we needed to set up Ads on one of our websites using our Ad Partner’s configurations. This required us to change our DNS records and IP Address which had to conform with Sucuri’s CDN configurations. So, we reached out to the Sucuri Customer Support Team and they were incredibly helpful by first, letting us know that they had a setup guide for our own Ad Partner’s setup, and this guide was sent to us. Secondly, they looked through our configurations and made us aware that we were on the right track. Furthermore, they were on standby if we needed further help.
Conclusion
Evidently, we’ve seen so far that Sucuri Website Security is a robust and comprehensive security solution. It is clear that you can benefit from a multifaceted approach to taking care of and dealing with ever-emerging threats to your digital assets.
Maybe you own a personal blog, maybe it’s an e-commerce website, or even a corporate website, with Sucuri Website Security, you can be at peace that your sites will be secure and protected from the present and ever-evolving threats in the online space.