
The release of the Matterport Pro3 camera has come with a lot of expectations. Matterport released the Pro2 3D camera a few years ago and this converted a lot of doubters into believers. Now, the company is back again with the Matterport Pro3 3D camera. With this camera, it’s safe to say that the brand has finally hacked the balance between functionality, quality, and ease of use.
Wondering how well the Matterport Pro3 camera performs? Join in as we explore that. This review is birthed by extensive testing in large spaces, small rooms, indoors, outdoors, and every other condition you can imagine. So, expect a comprehensive overview of your potential expectations from the Matterport Pro3 camera.
The Matterport Pro3 Camera
From VR headsets and observatories to full 360-degree pictures, all these things reflect a single purpose – offering you an immersive experience. They want to soak you deep into a different world. They try to trick your mind into an immersive field with engaging screens and moods. However, all they do to achieve this is shoot flat 2D images to observe with a VR.
Despite immersive this feeling could be, it still has a long way to go. The recently released Matterport Pro3 camera does more than just create plain 2D pictures and render them for VR. Instead, it helps you shoot arresting 3D images based on real life.
In essence, the Matterport Pro3 camera doubles as a 3D scanner and a camera. It has a sizable lens at the front. This is what captures the 360° rotation of your location. Then, there is a scanner, LiDAR, which estimates distances across every direction.
What most 360° cameras do is shoot various frames stitched together. When you view this under a VR you’ll always notice some distorted images, looking static and flat. The distortion becomes even more prominent when you move. This experience is several miles below what the Matterport Pro3 camera offers.
The camera uses a bit more complex image and data framework than static 3D shots. Anytime it captures its data, it sends it to the Matterport computer. This processes the data, assesses the area, and creates a 3D mesh of it. As such, it maps these shots into 3D models.
Since you now have 3D shots, you can be sure of a more photo-realistic representation of your space when you view it through a VR system. Expectedly, this elevates the immersive feeling you get.
Matterport Pro3 Camera First impression: Unboxing
The Matterport Pro3 camera unboxing is quite different from what you’ll get in most hardware. The positive difference, of course. For most hardware, you’ll have to pull out truckloads of packaging. But this camera features relatively simpler packaging. You only have to open a box and this is as seamless as it gets. This box contains the Matterport Pro3 camera itself, the charger, and an adapter. You can use this adapter to mount it on your camera stand.
There is also a carrying case, with a simple yet exquisite design as well. This case embodies minimalism on one end and a premium feeling on the other. It offers all these with that peace of mind that your camera is safe. All in all, you can completely unbox, plug and connect everything even without checking out the instructions. That’s how easy it is.
However, there is a part where the instruction manual comes in handy. This is when you need to download the companion app on your preferred operating system. For iOS, the app takes up about 650MB. If you follow the instructions, it is relatively easy to sign up, sign in, and hit the ground running with the application.
The Matterport Pro3 camera features three parts. The first is the battery. You’ll find the slot for this under the camera. Next is the USB charger and the last is the quick-release tripod. This tripod clips under your camera. Underneath, you’ll find a metallic attachment with a few inches of thread. This is what screws perfectly with a standard tripod. Remember, you have to remove the head of these tripods before using them.
The Matterport Pro3 camera has a pretty unusual yet innovative look. It’s just as the pictures say it is. Check out the front and you’ll find its sizable lens that takes pictures of your location.
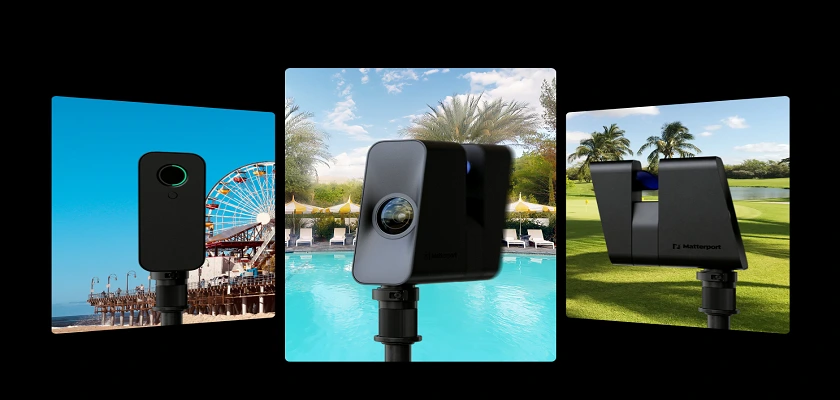
Then, there is the intelligent LiDAR mirror in the middle, serving as the primary 3D system of the camera. Now, when you take a look at the back, what you’ll find is a small screen and a power button. As mentioned before, underneath is a socket that your tripod can attach to.
The design of the Matterport Pro3 takes minimalism to yet another level. You’ll hardly find any control button on the design. You have to carry out almost every one of the main controls using the smartphone app mentioned before instead of the camera itself.
It has a weighty and solid build with alluring exteriors. If you’ve not seen the lens before, you wouldn’t know this is a camera.
With just a glance at the camera design and the companion application, the target audience is already clear. Of course, photographers will find the Matterport Pro3 camera interesting, fun, and worthwhile. But the truth is the camera is most tailored for commercial buildings, real estate, and architecture enthusiasts. Still, with no doubt, there are several other professionals that will find it handy.
The LiDAR Sensor
This is perhaps the most clever bit of the entire Matterport Pro3 camera system. This is what the camera uses to create a 3D representation of your specific location. Whether you’re capturing indoors or outdoors, it works just fine. Remember poor indoor quality was one of the concerns of the previous Pro2 3D camera. But with the Matterport Pro3 camera, this concern is inexistent.
What the LiDAR sensor does is send out laser beams and calculate how long it takes for the light it sends out to return to its sensor. With this, it can get the surrounding distances and build an interactive 3D mesh with these estimations.
This is the nucleus of the immersion, photorealism, and interactivity the Matterport Pro3 camera promises. And best believe you won’t get any of these to their maximum using just any camera.
If you work in the real estate sector or you’re an architect, the Matterport Pro3 camera offers you the unique ability to represent buildings with more realism. In fact, you can now say goodbye to pricey 3D modeling or on-site project commissioning.
How does the Matterport Pro3 camera work?
Firstly, you have to mount the Matterport Pro3 camera on your tripod. Then, press the shutter button on the companion application. Once you press this, the camera starts scanning. It does this by rotating 360° and taking shots of everything that surrounds it. Remember, both the lens and LiDAR sensors are working at this point. So, the camera combines the created 3D mesh and the captured image to build a textured 3D model. You can then navigate this model in a virtual space.
Right on the companion application, you only need a few clicks to build a dollhouse view of the surroundings, 3D models, and floor plans. In fact, you can open these models on another application to fine-tune them and edit them to your preference.
All in all, the first impression of the Matterport Pro3 camera is very positive. It embodies eye-arresting minimalism and sleekness. The case mentioned before is also scratch-proof. But remember, that it can only do a little when the camera drops. For how small it is, it is quite surprising that the camera is relatively heavy.
How well does the Matterport Pro3 camera 3D perform?
Hitting the ground running with Matterport Pro3 camera is quite straightforward with a quick setup and all. All you have to do is insert the battery and screw on a tripod stand.
You can be sure of a better shot when you place the tripod five feet above ground level. So, be sure your tripod stand reaches up to that level.
Once you have your camera in place, you can then hit the power button. Then, you’ll see a small screen showing the brand logo as it boots. The Matterport Pro3 camera takes about a minute or two to completely boot up. During the process, you can start loading the smartphone app simultaneously.
The capture app will tell you to register if you’re a first-time user. This could take quite some minutes. When you’re done with that, you can then connect your camera to the application when it finishes booting.
A remarkable feature of the Matterport capture app is the ability to capture 360° with it. However, you won’t be able to use 3D scanning. You can use the app with your iPhone. It works impressively with the iPhone 11 pro. But you can only get 360° with this and not 3D rendering.
Once your camera is done booting, you can then pick its Wi-Fi network on your smartphone. Then, return to the app. You can then start visualizing from your phone camera. With this set up, all you have to do is hit the shutter and it hits the ground running.
After the camera completes its first scan, you can visualize the floorplan view of the location you’re capturing. Then, you can move your camera a few paces before taking your next scan.
The software does quite excellently in stitching various areas together. So, even if you try walking several routes in a location, it does excellently. For instance, if your home has a corridor with several rooms you can walk these corridors back to the rooms. As long as the room doors remain open and the camera has specific reference points to work from, you can always expect quality results.
After the Matterport Pro3 camera completes the scanning, you can then include markers. Markers are elements like mirrors, windows, doors, etc. You can also change your surrounding layouts using realign tools.
After capturing and you love what you just created, all you have to do now is upload the files to the Matterport server where further processing takes place.
Usually, a simple scan of your room can take up to 10 minutes for processing. But if you’re dealing with a full floor scan, expect this to last up to an hour.
After processing, the files return to your mobile app, where you can now include hotspots. Viewers can click these to see more information about them.
Final Thoughts
When it comes to 3D imaging, the Matterport Pro3 camera undoubtedly hits a sweet spot. Even if you have only basic photography knowledge or you’ve never done anything related to 3D imaging before, you can pick up the Matterport Pro3 camera and start using it without any hassle. All you have to do is follow a few digital instructions and you’re good to go.
Overall, the image output quality is impressive. Well, that’s expected from a camera that shoots with a 20MP sensor. Its ultrawide field view also makes it easier to cover an extensive space without leaving out any details. Even in high sunlight conditions, you can always expect the best from the Matterport Pro3 camera.
It is clearly made for areas where you can walk through or anyone looking to showcase a particular space. It is 4x faster than the previous Pro2 model as well, helping you achieve more within the least possible period.
At first glance, the Matterport Pro3 camera looks nothing like your average camera. And when you take a step forward, it’s still the same. It works completely differently from your DSLR or other cameras. It has a straightforward setup process and almost every control is via your smartphone app.
The only thing that involves you in the capture process is pressing the shutter button on the app. Once you do this, it handles the rest. All you have to do now is bend down to avoid seeing yourself in the shot.
When scanning large areas as well, you find its extended battery life handy. It features over 3 hours of scan time which is enough to process several layers of images. Also, this extended battery life only takes a few hours to recharge. If your workload is quite a lot, you may consider getting an additional battery to swap.
Once the Matterport Pro3 camera completes processing, the results are quite impressive. The camera eliminates the complexities related to 360° and 3D imaging. With its awe-inspiring technology, its price is definitely no outrageous amount to pay.

