
The Lorex Solar Panel can be a great addition to your existing battery-powered camera installation or a new camera deployment. This is so because it provides for better battery management and extended battery life.
The Lorex Solar Panel just like any other solar panel simply provides an external source of electricity to your camera. This helps to ensure that your camera is not plugged continuously into your Grid or Mains electrical power. This means that your camera’s battery is required to discharge and recharge from time to time.
Having the Lorex Solar Panel plugged into your camera ensures that when the heat from the sun becomes unavailable, the camera’s battery continues with the supply of electricity seamlessly. With this, the camera’s battery can discharge and then recharge when the heat from the sun becomes available. Also, the solar panel helps to keep your camera’s battery charged if where you have mounted your camera doesn’t have a Gird or Mains powers supply.
This article reviews the Lorex Solar Panel to provide a better understanding of its workings, and to guide you in your decision-making process.
Let’s get started.
Overview of the Lorex Solar Panel
As the world is gradually moving from fossil-fuel-generated electricity to green, renewable electricity sources, solar panel implementations are becoming more popular. This is evident in the Lorex Solar Panel which functions no differently from other solar panels that you have seen.
A solar panel simply functions by converting the heat from the sun to electrical power. This electrical power can then be used to power small to large electrical devices. In the case of a battery-powered camera, this requires a small amount of power and is similar to that of your mobile phones, tablets, etc. Every electrical device has a rated power for it to function, and this is why a solar panel having an output power rating similar to that of a camera, mobile phone, tablet, etc. can power any of them effectively. Electrical power is in the form of Direct Current (D.C) or Alternating Current (A.C). In the case of Alternating Current and solar panels, Direct Current is actually converted to Alternating Current with the use of an inverter. Along with D.C and A.C comes Voltage; So, Electrical Power requires Current and Voltage basically. There are other concepts with respect to electrical power, but this is just a basic explanation of what you should expect to get with the Lorex Solar Panel or any other solar panel.
The Lorex Solar Panel has two major models with each having an Output Voltage rating of 5 Volts, a Maximum Output Current of 600mA, and a Maximum Power of 3 Watts. The solar panels have an Ingress Protection of IP66, with a water-resistant cap. They have an operating temperature between -30⁰C to 50⁰C (-22 ⁰F – 122 ⁰F) and can function optimally within this range.
Let’s see how to carry out the installation.
Installing the Lorex Solar Panel
Installing the Lorex Solar Panel or any other solar panel requires that you find an appropriate location. This location or position has to be a place that receives enough sunlight. This position has to also be free from shades that would be created by trees, neighboring buildings, etc.
You also have to consider the fact that dust and debris do settle on solar panels. When this happens, the panel’s ability to absorb the sun’s rays is greatly reduced. So, there would be times when you have to clean the solar panel to get back its optimal capacity.
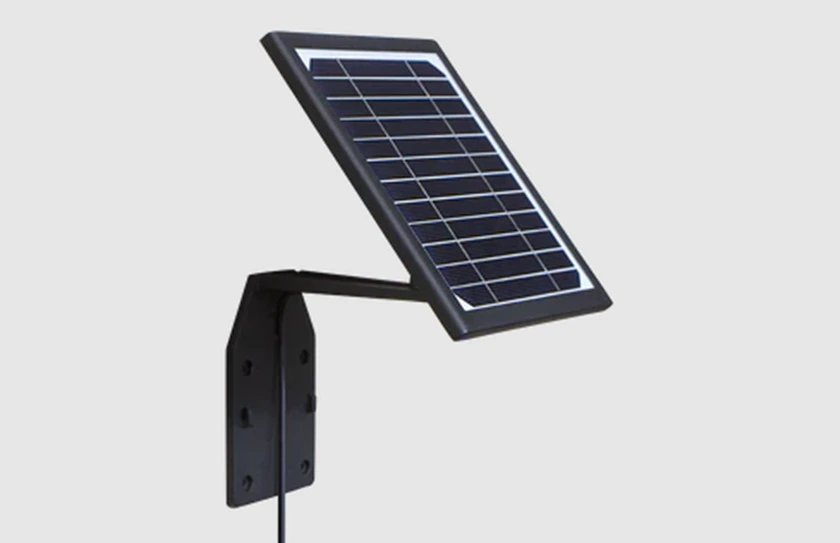
When installing the Lorex Solar Panel, you can decide to do this in two ways. You can either mount the solar panel along with your Lorex-supported camera or mount the panel away from the camera. However, the second option is recommended.
When you open the package, you will find everything required to set up the solar panel and these include; a wall mounting bracket, mounting template, cable guides, cable guide screws, mounting screws & anchors, a drill bit, a quick start guide, and the Lorex Solar Panel itself with a 3 meters power cable.
To mount the solar panel using the recommended method, simply take out the wall mounting template and place it on the wall. Then drill holes as indicated on the mounting template and insert the mounting anchors into the holes. Next, take out the wall mount, loosen the adjustment ring, turn it to face the front of the wall mount, and tighten it. Then, screw the ball joint from under.
The next step is to fix the wall mount on the solar panel. Do this by rotating the wall mount till it is fully threaded into the solar panel. Now, take them and place the wall mount on the wall, and screw it into place. At this point, you are done with the installation. You can now take the power cable and plug it into your camera’s USB charging port.
Choosing the right Lorex Solar Panel
Choosing the right Lorex Solar Panel is important so as to get the desired benefit of having one. Also, an understanding of power ratings as explained in the ‘’overview of the Lorex Solar Panel’’ will also help in making the right choice. However, the table below shows the Lorex solar panels and Lorex-supported cameras.
| Camera Series | Supported Solar Panel |
| Lorex U424AA | ACSOL1B |
| Lorex U222AA | ACSOL1B |
| Lorex LWB6850 | ACSOL1B |
| Lorex LWB4850 | ACSOL1B |
| Lorex U471AA | ACSOL2B |
Frequently Asked Questions
(1) How do you know the Lorex Solar Panel is working?
At the back of the solar panel, you should see a red LED showing if the solar panel is receiving sunlight.
From the Lorex Home App, you should also see the battery charging indicator showing charging taking place. If you are using the Lorex Smart Home Security Center, you should also see the battery charging indicator.
(2) How long would it take for the Lorex Solar Panel to charge a battery to full capacity?
With enough sunlight, the solar panel can charge a battery outside the camera between 4 – 6 hours. If the battery is with the camera and the camera is powered ON, the charging process takes a bit longer.
(3) What makes the Lorex Solar Panel not charge?
If it is a cloudy day, the solar panel may not be able to charge the battery as adequate sunlight is essential to get optimum power from the panel.
If dust accumulates on the panel, it will be unable to deliver as expected. Cleaning it will enable it to absorb enough sunlight and deliver enough power again.
Lastly, if the temperature of your environment is outside the operating temperature of the Lorex Solar Panel, it will not perform as expected.
Final Thoughts
Including the Lorex Solar Panel with your battery-powered or wire-free supported camera is recommended. It provides for better battery management and a prolonged lifespan.
However, there are some factors that may affect the solar panel’s capacity to deliver full power just as with any other solar panel. But overall, the performance of the Lorex Solar Panel is satisfactory.


You may want to see our review of the eufyCam Solar Panel, Arlo Solar Panel, or the Reolink Solar Panel.