

The Wordfence Security Plugin is a very popular multipurpose security solution that’s designed to empower WordPress website owners and administrators to fortify their online presence.
In a world where cybersecurity and ceaseless battles against digital threats are a paramount concern, a sophisticated defense mechanism is key to repelling, neutralizing, and staying on top of these relentless threats. The Wordfence Security Plugin features a sophisticated array of features like a firewall, real-time threat detection and intelligence, advanced malware scanning, login security with two-factor authentication, strong password policies, monitoring and blocking of suspicious login attempts, and adaptability in real-time to thwart malicious traffic and known attack vectors.
Our review of the Wordfence Security Plugin showcases our first-hand experience with it, and how it is able to stand as a fortress to securing your WordPress website.
What is Wordfence?
This question arises always, particularly for those who are new to website security. Wordfence is a security plugin that’s designed to secure WordPress websites. It is tailored to the unique demands of the WordPress Platform such that it meticulously examines your website’s files, codes, themes, and other plugins, for unusual activity or malicious codes. The Wordfence Security Plugin ensures that your WordPress website remains resilient in the face of digital threats, and promptly quarantines and neutralizes threats in the event of any.
How to Install Wordfence Plugin in WordPress
Installing the Wordfence Security Plugin on your WordPress website and setting it up is a straightforward process. It is similar to downloading any other Plugin and activating it on your WordPress website. Firstly, you have to Log into your WordPress Admin Dashboard. Once in, on the left-hand side, navigate to the Plugins Tab, and with your mouse pointer on it, you will see Installed Plugins, Add New, and Plugin File Editor. Simply click on Add New and you will be taken to another page that shows you all Plugins already existing on your WordPress website and the option to search and install others (shown below).
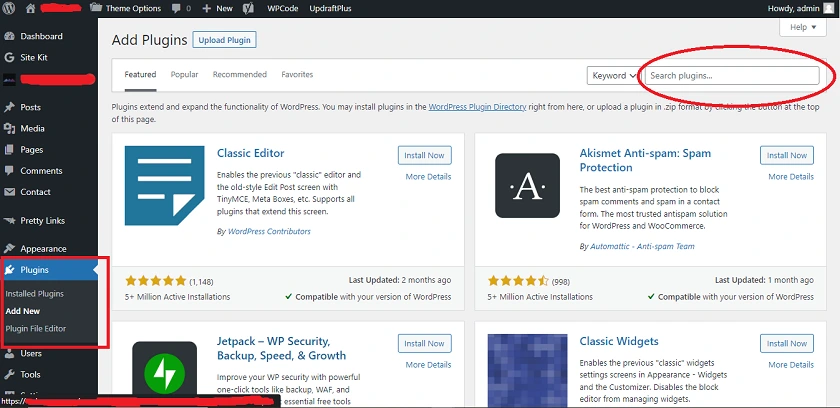
At the top right-hand corner where you have ”Search Plugins”, simply type Wordfence and another page will be presented to you. You will then see three Plugins which are; (1) Wordfence Security – Firewall, Malware Scan, and Login Security, (2) Wordfence Login Security, and (3) Wordfence Assistant. Select the first one, and click on ”Install Now”. After the installation is complete, the Install Now button changes to ”Activate”. So click on this to get the Plugin started. Now, the Wordfence Security Plugin will take you through the initial setup, and you will be required to enter your email address so as to receive alert notifications. Then, as you continue with the setup processes, you will be required to enter your API Key also known as your license key. You can go ahead to get a Premium License Key and get your Wordfence Security Plugin fully functional. Otherwise, proceed with the setup and continue with the free version. Once completed, the Wordfence Security Plugin will provide you with some basic options for you to configure. These are Enabling/Disabling the Wordfence Firewall, Scheduled Scanning, and other Security Settings. So, go ahead to change or review these Settings, and get them functional according to your needs. Lastly, click on ”Save Changes” to apply your Settings.
Features of the Wordfence Security Plugin
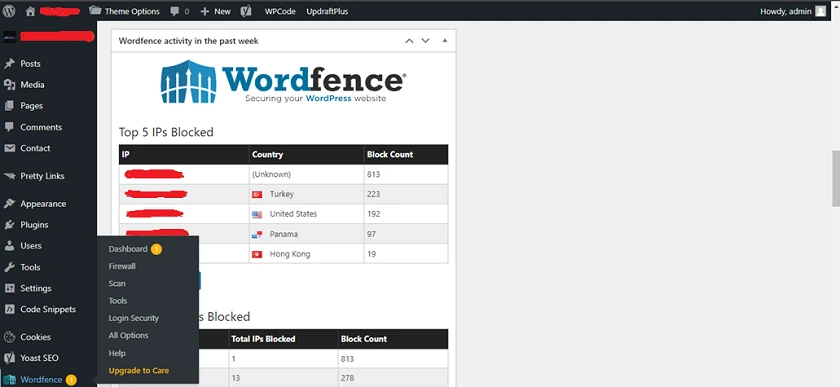
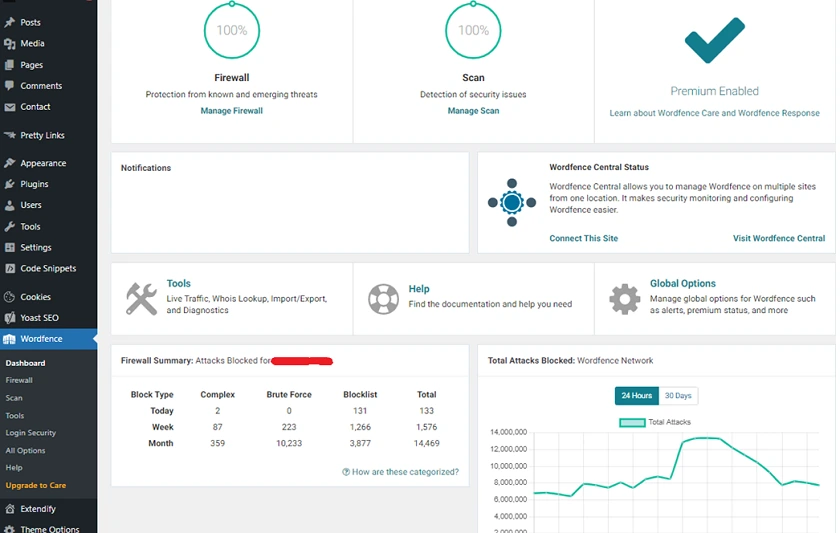
Looking at the Dashboard of the Wordfence Security Plugin, You will immediately notice Firewall at the top left-hand side. When you click on Manage Firewall, it takes you to the Firewall Options Page. Here, you find Web Application Firewall, Firewall Rules, Real-Time IP Blocklist, and Brute Force Protection. So, the Web Application Firewall takes care of Stopping Complex Attacks, the Firewall Rules are instructions that dictate how the Firewall manages all traffic and this is updated real-time. Then, malicious IP Addresses are blocked by the Real-Time Blocklist, and Brute Force Protection mitigates against Password Guessing Attacks.
Below these, you have the option to change the settings for Web Application Firewall Status, Protection Level, and Real-Time Blocklist. For the first one, the Default Setting is Enabled and Protecting, while you have Learning Mode, and Disabled as the others. For Protection Level, you can use this to temporarily disable extended protection when you are moving to a new host or a new installation location. For Real-Time IP Blocklist, this is Enabled by default.
Moving further, you have Advanced Firewall Rules. With this, you have options to (1) Delay IP and Country Blocking until WordPress and Plugins have loaded. (2) Immediately Block IP Addresses that access these URLs (3) Ignored IP Addresses for Wordfence Web Application Firewall Alerting, and (4) Rules. For this Wordfence Security Plugin Advanced Firewall Rules, there are Allowed Services you would find, and they are Sucuri, Facebook, Uptime Robot, StatusCake, and Seznam Search Engine. Then, for each of the Wordfence Security Plugin Advanced Firewall Rules, you can input your own URLs and IP Addresses as needed.
Next on the Dashboard is the Setting for Brute Force Protection. Here you have ”Lock out after how many login failures” (the Default is 20), ”Lock out after how many forgot password attempts” (the Default is 20), ”Count failures over what time period” (the Default is 4 hours), ”Amount of time a user is locked out” (the Default is 4 hours). Then, you also have an option to ”Immediately lock out invalid usernames”. In addition, you can add the IP Addresses of users trying to sign in with those usernames.
Moving further, the Wordfence Security Plugin gives you Additional Options under all these and they are; Enforce Strong Passwords, Don’t let WordPress reveal users in login errors, Prevent users from registering ”admin” username if it does not exist, Prevent discovery of usernames through WordPress XML Sitemaps, the WordPress REST API, et cetera. Then, Disable WordPress application passwords, Block IP addresses that send POST requests with blank User-Agent and Referer, Check password strength on profile update, Custom text shown on blocked pages, and participate in the Real-Time Wordfence Security Network. All these are already ”ticked” by default except for Block IP address that send POST requests with black User-Agent and Referer.
Next on the Wordfence Security Plugin Dashboard is Rate Limiting. Here you will find options to change how the Wordfence Security Plugin treats Google’s crawlers, if anyone’s requests are exceeded, if a crawler’s page views are exceeded, if a crawler’s pages 404s are exceeded, if a human’s page views are exceeded, if a human’s 404s are exceeded, and how long an IP Address is blocked when it breaks a rule. Lastly on this, you have a ”Box” that enables you to enter in URLs you want to permit. So, these are the features you would find in this area of the Wordfence Security Plugin Dashboard. Moving on to the Scan Tab for Wordfence, on the left-hand side of the WordPress Admin Dashboard, the screenshots below are what you will find.
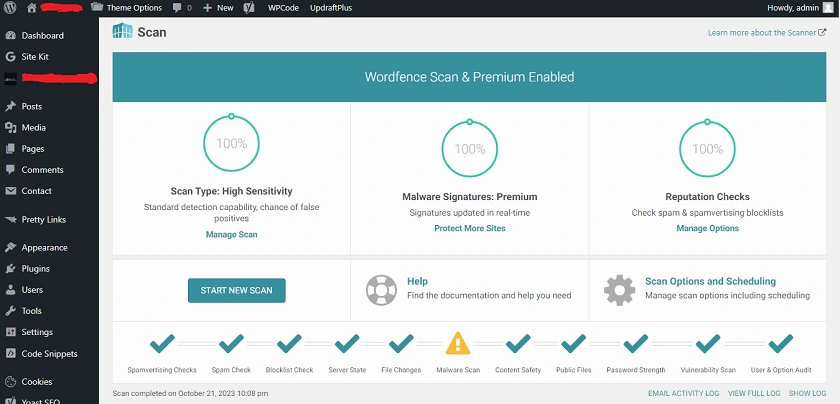
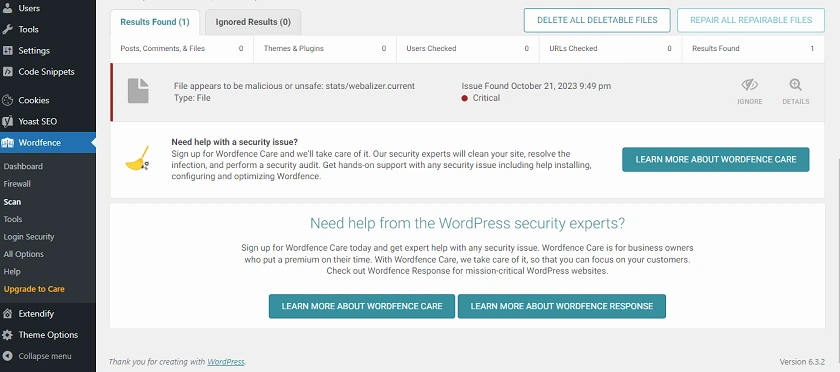
Now, on the Wordfence Security Plugin scan page, if you click on Manage Scan, this takes you to Scan Options and Scheduling. Here, you find Scan Type for High Sensitivity, Malware Signature, and Reputation Checks. Then, you will also find Basic Scan Type Options which are; Limited Scan, Standard Scan, High Sensitivity, and Custom Scan. As a Premium User, High Sensitivity is the Default. Below these, you have General Options and these are pre-configured settings that the Wordfence Security Plugin uses to perform scans. Next, you find Performance Options, and this allows you to choose Resource Usage that should be used for Scans such as ”Use low resource scanning”, ”Limit the number of issues sent in the scan results email”, ”Time limit that a scan can run in Seconds”, ”How much memory should the Wordfence Security Plugin request for when scanning”, and the ”Maximum execution time for each scan stage”. Lastly on this Wordfence Security Plugin scan page, you will find Advanced Scan Options. With this, you can ”Exclude files from scan using Wildcards”, ”Use Additional scan signatures”, ”Use only IPv4 to start scans”, and ”Maximum number of attempts to resume each scan stage”.
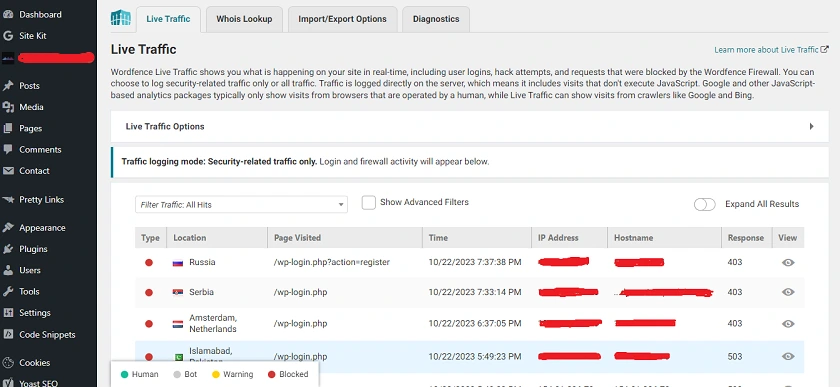
Moving on to the Tools Tab for the Wordfence Security Plugin, on the left-hand side of the WordPress Admin Dashboard, you will see that the Wordfence Security Plugin shows live traffic of what is currently happening on your website in real-time (shown below).
Then, at the top, you can click on Whois Lookup to see who owns an IP Address or Domain Name that the Wordfence Security Plugin had flagged. The next Tab to the Whois Lookup Tab is the Import/Export Options. This is used to clone the Wordfence Security Plugin’s configuration on your website to another website. So, you can simply click on Export Wordfence Options or Import Wordfence Options as the case may be. Next, is the Diagnostics Tab. With this, you can find and troubleshoot conflicts, compatibility issues, theme issues, and host environment issues, that the Wordfence Security Plugin detects. There are Sub Tabs you will find here and they are; Wordfence Status, Filesystem, Wordfence Config, Wordfence Firewall, MySQL, PHP Environment, Connectivity, Time, IP Detection, WordPress Settings, WordPress Plugins, Must-Use WordPress Plugins, Drop-In WordPress Plugins, Themes, Corn Jobs, Database Tables, Log Files, Other Tests, and Debugging Options.
Moving on to the Login Security Tab for the Wordfence Security Plugin, on the left-hand side of the WordPress Admin Dashboard, this takes you to ”Two-Factor Authentication” and ”Settings”. Firstly, Two-Factor Authentication obviously provides login security for your website. Now, the Wordfence Security Plugin can work with a good number of TOTP-Based Apps, some of which are; Google Authenticator, FreeOTP, and Authy. To see the entire list, you may visit this link. Then, the Wordfence Security Plugin’s Two-Factor Authentication also gives you the option to (1) ”Scan Code or Enter Key” (2) Enter Code from Authenticator App. So, on this page, you find a QR Code and a list of Recovery Codes that you can use or Download. Moving to the Settings Tab, clicking on it shows you User Summary, 2FA, WooCommerce and Custom Integrations, reCAPTCHA, General, and NTP. It is worth mentioning that the Wordfence Security Plugin already has all these set, and you do not have to change them, except you need to.
Moving on to the All Options Tab for the Wordfence Security Plugin, on the left-hand side of the WordPress Admin Dashboard, you will find Options that you can play around with, provided you understand what you are doing, as this area is designed for Experienced Wordfence Users. Firstly, you have a Wordfence Global Options Tab. Here, you will see the License Key for your Wordfence Security Plugin, then options to Reset Site to Free License, and Manage your Wordfence Licenses. Then, you will also find View Customization, General Wordfence Options, Dashboard Notification Options, Email Alert Preferences, and Activity Report. The next Tab is Firewall Options. Within this, you have Basic Firewall Options, Advanced Firewall Options, Brute Force Protection, Rate Limiting, and Allowlisted URLs. The next Tab is Blocking Options. Here, you have Advanced Country Blocking Options. The next Tab is Scan Options. This takes you to Scan Scheduling, Basic Scan Type Options, General Options, Performance Options, and Advanced Scan Options. Tool Options is the last and within it, you have Live Traffic Options, Import/Export Options, and Login Security Options.
Moving on to the Help Tab for the Wordfence Security Plugin, on the left-hand side of the WordPress Admin Dashboard, here you find Support for the Wordfence Security Plugin. There is the Premium Support Option and the Free Support Option. In addition, you have Documentation for Wordfence Free, Wordfence Premium, Wordfence Care, Response, Incident Response Services, License Key, Account and Billing History, Wordfence Central, Dashboard, Firewall, Blocking, Scan, Tools, Login Security, Advanced, Wordfence Security Plugin and GDPR, and Wordfence Intelligence Webhook Notifications.
Upgrade to Care is the last Tab for the Wordfence Security Plugin, on the left-hand side of the WordPress Admin Dashboard. When you click on it, you are taken to the Wordfence Homepage where you can then Log in, and opt for hands-on solutions from the Wordfence Security Experts.
Performance of the Wordfence Security Plugin
Firstly, the vast array of features we’ve seen so far in the Wordfence Security Plugin, is what has made it a go-to security solution for so many WordPress websites all around the world. We’ve had no reason so far to fault this plugin, as it has more than satisfied our security expectations.
At the core of the performance of the Wordfence Security Plugin are its Firewall, Malware Scanning, and Real-Time Threat Detection. These work efficiently in maintaining a vigilant eye on your website’s integrity. They are very well able to repel and neutralize malicious traffic in real-time, and known attack vectors. Also, you will be sent emails every now and then about Login Attempts, When the Attacks Increase, even when you as an Administrator log’s into your WordPress Admin Dashboard, you will receive that email. In addition, when other Plugins on your website are due for Updates, even for the WordPress Platform, the alert notification shows up on the Wordfence Security Plugin as well as an email that will be sent to you.
Final Thoughts
The Wordfence Security Plugin is a sure armor against the relentless attacks on WordPress websites on a daily basis. It is robustly designed with a state-of-the-art firewall, malware scanner, and real-time threat intelligence to provide an impenetrable shield for your WordPress website. As an Admin, you will also find enough tools to fortify your online presence. In the end, you will have the peace of mind that you seek, knowing that your website, its data, and your business is secure.
Get Wordfence (Intelligence) on the Official Wordfence Website
If you want to try an alternative, and get a 30 Day Free Trial, you may see our Review of Sucuri and get a Trial.