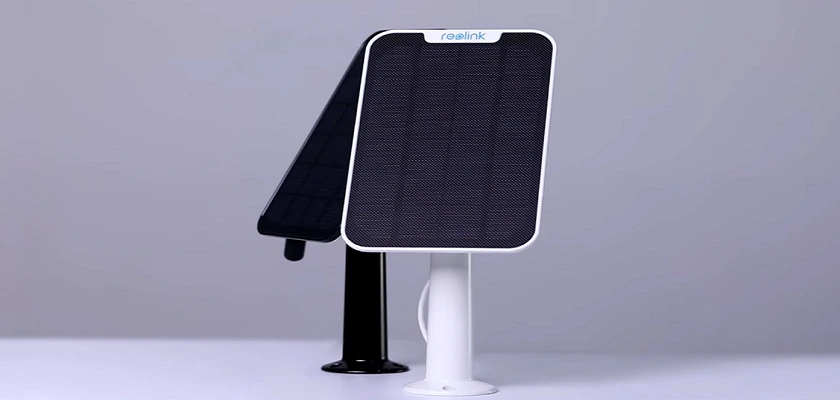
The Reolink solar panel is an accessory that provides electrical power to your Reolink-supported camera. This is designed to provide you with external power, independent of your regular power supply.
Reolink is a major player in the smart home and security devices market. They feature various types of cameras such as Battery Powered IP Cameras, Dual-Lens IP Cameras, PoE/Wi-Fi Cameras, Video Doorbells, Floodlight Cameras, and so on. Accessories such as Solar Panels, PoE Injectors, Junction Boxes, Brackets, Ethernet Cables, NVR’s, etc. are also produced by the company.
This review is focused on the Reolink solar panel, and aimed at providing sufficient information to enlighten, guide intending users, and recommend best practices in getting the best out of the Reolink solar panel.
Let’s get into it.

First Impressions and Overview of the Reolink Solar Panel
The Reolink solar panel is a solid, sleek, well-built, and attractive device. It has a very good feel of being robust and made of high-quality material. It is IP65 waterproof rated which ensures that in any weather condition, it will not pack up. Its operating temperature is between -10 Degrees and 55 Degrees Celsius. It weighs 280 grams and has a dimension of 13.25×197.5×13.2 Millimeters.
It comes with a 4 meters standard USB cable. What this means is that, with a standard USB cable, you can use your Reolink solar panel to charge a whole lot of other devices such as mobile phones, iPods, etc. However, this doesn’t mean it can charge these other devices at the same time; you need another panel to charge these other devices.
Charging other devices is possible because most small electrical devices use power ratings that are supported by the Reolink solar panel. To learn more about these power ratings, see our review of the eufy solar panel.
Also, the 4 meters cable gives you a very long range in placing your panel and connecting it to your camera. Along with the Reolink solar panel comes a wall mount, capable of rotating 360° to help you properly fit, and angle your panel accordingly.
Let’s see how to install the solar panel.
Installing the Reolink Solar Panel
Installing the Reolink solar panel is a very simple process. But before installing the panel, you must ensure to find a proper location where enough sunlight can get to the panel always.
Also, this is very essential because, on some days, sunlight may not last for so many hours. So, it is essential to place the panel where the sunlight would normally start out so that your panel receives as much as is available for that day.
In addition to this, ensure there are no obstructions such as trees or buildings in the direction of where your panel would face. Any obstruction would reduce the amount of sunlight that should get to your panel, thereby reducing the power it can deliver.
Do note also that in the dry season, dust accumulates on solar panels generally. It is necessary for you to clean your Reolink solar panel because this dust reduces the ability of the photovoltaic cells to suck up sunlight.
To fix your Reolink solar panel, you need three screws (included in the box) to fit the mount to your desired position. Take out the mounting hole template and paste it on the wall. Then, drill three holes as shown on the template, place the mount, and screw it to the wall. The last step is to place the solar panel on the mount and screw it to the mount by turning it till it is fully threaded.
When the Reolink solar panel is installed, make sure to tilt it angularly so that it receives adequate sunlight. This will also ensure debris does not gather on the panel.
Now, take the micro USB cable on your panel and plug it to your camera. The charging LED on the USB charging port of your camera should come ON. Also, on your Reolink app or Windows application, you will see the battery icon of your camera change to charging mode.
With your Reolink solar panel in place, your camera will have continuous power daily, outside of your regular power supply.
Specifications of the Reolink Solar Panel
Every solar panel has its power rating. These ratings tell you what you should expect to get from your panel. The Reolink solar panel is rated at 6 Volts, a Current of 530mA, and a maximum Power of 3.2 Watts.
Reolink Solar Panel Supported Cameras
The Reolink solar panel supports specific Reolink cameras which are listed in the table below.
| Reolink Argus 2 | Supported |
| Reolink Argus 2E | Supported |
| Reolink Argus Eco | Supported |
| Reolink Argus Pro | Supported |
| Reolink Argus PT | Supported |
| Reolink Argus PT 2K | Supported |
| Reolink Argus 3 Pro | Supported |
| Reolink Argus 3 2K | Supported |
| Reolink Go | Supported |
| Reolink Go Plus | Supported |
| Reolink Go PT | Supported |
| Reolink Go PT Plus | Supported |
| Reolink Duo | Supported |
| Reolink Duo 4G | Supported |
| Reolink TrackMix Smart Batttery Camera | Supported |
Do note that some of the cameras in the list above are now retired. However, if you own any of the retired cameras, you can still use the panel with it, or if you want to upgrade to another camera, you can as well do so.
Frequently asked questions
(1) How long would it take the panel to fully charge your camera battery?
This depends on how low or discharged your battery is. If your battery is completely discharged, it can take days to bring it up to 100% especially if you decide to power it ON.
Secondly, if the weather conditions are not very fantastic, the amount of power the panel can produce will be reduced.
(2) How do I know that the panel is functional?
When you plug in the USB cable from your panel to your camera, you should see the charging LED of your camera come ON. If your battery needs to be charged, the LED should show Orange. But if your battery needs no charging, the LED will show a Green light. Also, on your Reolink app, you should see the battery indicator icon change to charging mode.
(3) My camera’s charging LED is flashing Green and Orange continuously and the camera is not coming ON, what should I do?
This means your camera’s battery is faulty and should be replaced.
Conclusion
The Reolink solar panel proves to be an efficient and useful alternative source of power for your cameras and similarly rated D.C devices. The beauty and satisfaction of using an Eco-friendly, clean alternative source of energy is evident in this device. If you wish to try it out, find links below to get it.


