I have been using Reolink cameras for many years now and I have always thought that they could do even better by making the night vision from their cameras just as it is in the day.
In 2023, I saw that they introduced the Reolink CX410 and tagged it as the first Color X camera in this line of cameras for night vision performance. This got my attention and led me to purchase the PoE version of the Reolink CX410.
I am going to provide guidance in this article on my findings, and overall benefit so far, since over a year of my using the Reolink CX410 PoE camera.
Let’s get started.
Opening the Package of the Reolink CX410 PoE Camera
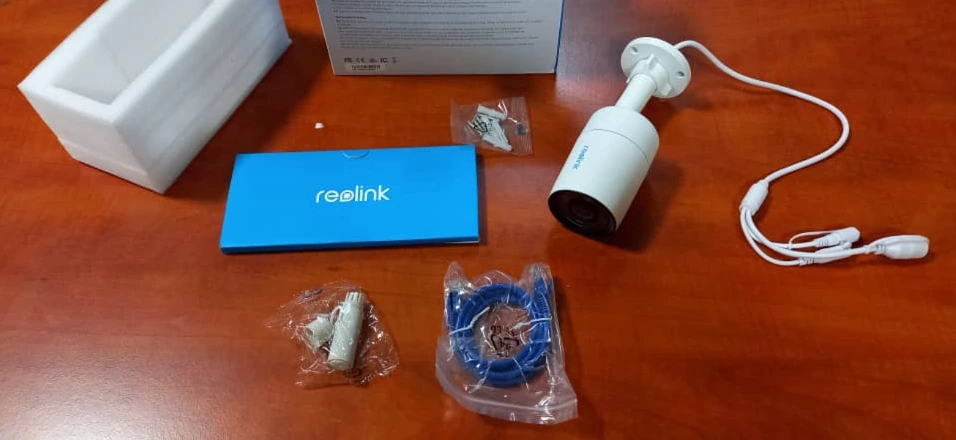
As you see in this first screenshot, these were the items in the box of the Reolink CX410 PoE camera. The Ethernet cable was short for me, so I got a longer one to use in my installation.
My first impression having seen the Reolink CX410 PoE camera was that of a very well-built equipment. This is a 4 Megapixel camera capable of 30 Frames Per Second and Default 2560 x 1440. It is built with Four Leds that are the Spotlights and these are in Yellow when they are ON. I am very used to White Spotlights but on this one, I accepted it as it is.
The Reolink CX410 has an 89° Field of View Horizontally, and Vertically at 46°; I personally find this sufficient. If you look under the camera, you will find two screws that cover the Loud Speaker’s compartment.
Moving to the back of the camera, you will see a Memory Card compartment also covered with two screws. This camera accepts Memory Cards of up to 256 GB. If you look at the picture above, it shows that the Mounting Bracket is attached to the Reolink CX410 and this is how it was in the package. With this Bracket, you can tilt the CX410 to a maximum of 90°. I’ve attached this next picture to let you see how it looks.

My Reolink CX410 is the PoE Model as I already mentioned and they have the Wi-Fi Model also. The reason I preferred the Reolink CX410 PoE camera to the Reolink CX410 Wi-Fi camera was because the PoE Model was able to do 30 Frames Per Second while the Wi-Fi Model does 25 Frames Per Second. Whichever one you want, you can find links at the end of this review.
How to Set Up the Reolink CX410
Firstly, in terms of Powering the camera, I already decided that I would use a D.C 12 Volts adapter with my Reolink CX410. In my installation, you can see in the picture that I used a box (4×4) to mount mine and this is because of the type of wall.
Before taking the camera outside and fixing it permanently, I connected the Power and Ethernet cables accordingly and added the camera in the Reolink App. Just to add here, the cable connections can be done with the devices you have or may purchase. What I mean is that for example, with a PoE Switch you connect the CX410’s Ethernet cable to the camera itself and to the PoE Switch. Then, the Ethernet Cable your ISP Provided is plugged to this PoE Switch also.
A PoE Injector is another piece of equipment you can use. With this, plug one side of your camera’s cable to the Port that is labeled PoE, and then your ISP’s cable to the Port that is labeled LAN.
In my own installation, I had a TP-Link Hub before I bought the Reolink CX410, so I simply connected the cable from my ISP to a Port on the Hub, my CX410’s cable to another Port on the Hub, and my Wi-Fi Router to another Port on the Hub. I Powered the camera with a 12 Volts, 1 Amp D.C Adapter.

With these in place, I connected my phone to the Wi-Fi Signal that was coming out of my Wi-Fi Router. The next thing was to open the Reolink App and select the Add Button and the camera was found.
It was after these that I took my Reolink CX410 outside and I started to watch the Live View from the camera. I shifted it again and again around the position that I intended to mount it so that I could get the perfect position, and I obviously did.
The Reolink CX410’s Features in the Reolink App
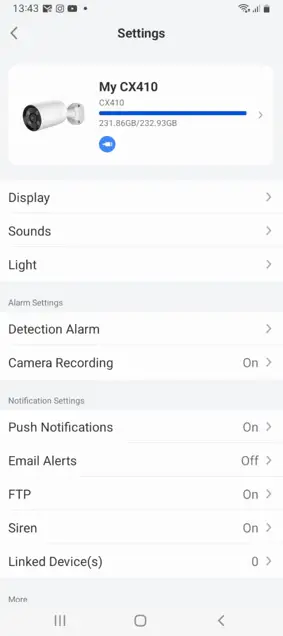
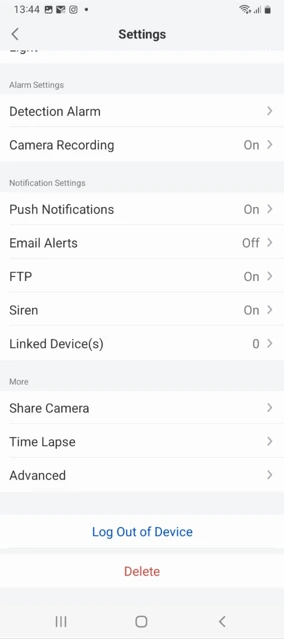
On the homepage of the Reolink App, you will find features right there to play around with. You will find a button for the Siren, one to change the View so that you can see not just one camera but Four at once, and so on. Still on this, you have a button for the Spotlights, a button for the Settings area, Pause, Speaker, Snapshot, Video Record, a button to change the FPS (Clear, Balanced, and Fluent) and see in Full Screen. I will now move to the Settings for the Reolink CX410 and show them with the pictures below.

How the Reolink CX410 has performed so far
At the start of this review, I said that I was interested in this camera because I wanted to see the night vision like that of the day. Also, the CX410 as the first camera in the Color X Series was another attraction for me.
Coming to the night vision on the Reolink CX410, I can tell you that it is very beautiful. At night, when you look outside and look at the Live View from the camera, you will see that the Live View is brighter than the ambient view that you’re seeing. The camera’s ability to harness ambient or artificial lighting is truly remarkable. I have bulbs that are close to my Reolink CX410 (One on the right and one on the left) these bulbs are around 10 Meters from the CX410 and there is no reason for me not to use these bulbs. So, at night, I rarely use the Spotlights on my CX410 as the lighting is more than sufficient, and what I get from the camera is excellent footage.
My Reolink CX410 is 25 Meters from the gate of the compound. Right at the gate, I clearly see who is entering. With this in place, I have removed the camera that I was using here before which is from a different brand.
Motion Detection Capabilities
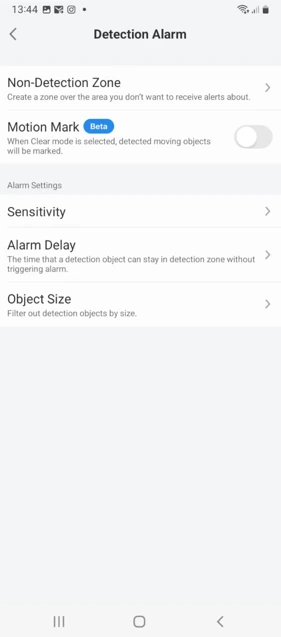
In all my cameras, I always set Motion Detection to the highest. This is so in my Reolink CX410 and to do this. Navigate to the Settings area and tap on Detection Alarm. This will lead you to Motion Detection settings, and you will also find Motion Detection and Smart Detection.
In the Motion Detection option, you can increase the Sensitivity between 0 and 50. While for the Smart Detection option, you have between 0 and 100 for either Persons, Vehicles, or Animals.
Speaking about this Motion Detection feature, I can say that I do not find any fault with it except that as at the time I am writing, sometimes, the camera will indicate in the recordings that it detected an Animal for a Child. This means that it actually detected a Child but interpreted this to be an Animal. So, I believe Reolink will sort this out.
Moving on, in the entire area of the camera’s view, you can grey out areas that you wouldn’t want to be notified about. You do this using the Non-Detection Zone option. Let me also say here that my CX410 can see beyond the compound to a major road on the street. With several vehicular movements and persons, I do not need that. So, I have simply Painted the area in the Reolink App (from above the gate to the compound) so that the camera notifies me of only movements right when the gate is opened.
At nighttime, I have Automated the Siren to come ON when the camera detects Persons. You can add for Vehicles and Animals too but I prefer to have this for Persons only because any vehicle wanting to come in must have the person come down to open the gate. I set the time for the Siren to begin at 10:00 PM and stop its operation at 6:00 AM. In addition, the Siren from my CX410 is very loud. When it sounds, I immediately know where the sound is coming from and not my other Reolink cameras.
I will mention here also that the Reolink CX410 allows you the option to set the Spotlights to come ON when the camera detects motion. I do not have mine ON because I like the camera functioning discreetly, and I do not want the camera adjusting its Spotlights with the lights already ON around the house while the movement of individuals is taking place.
Speaking of the Notifications, I am okay with the response time and the prompts every now and then for either Persons, Vehicles, or Animals. There is also the option of Email Alerts. I do not currently use this because I get alerts from the several cameras that I have and my Email Provider blocks my box very often. However, you can set this up in the Reolink App and you will get One Snapshot for every notification.
Other Aspects of the Camera
The Reolink CX410 gives you Two-Way Talk and Smart Integration with Google Assistant. Then, while you are the owner of the camera and the Administrator as well, you can give your acquaintances access for up to 19 persons. The CX410 is an IP67 Outdoor camera and a very well-built device.
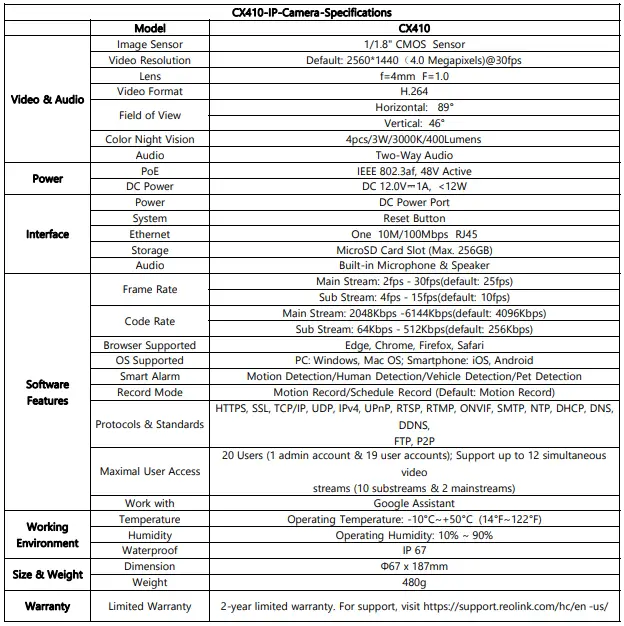
Specifications of the Reolink CX410 PoE Camera
Conclusion
My primary aim of getting the Reolink CX410 was because of the night vision. I really wanted to see what it would be like knowing that the CX410 was the first in the unique line of Reolink’s Color X cameras. I can say now that my aim was achieved and I did NOT make a mistake getting and trying out the Reolink CX410.
Get the Reolink CX410 (Wi-Fi) on the Reolink Official Website


