This Pictory vs Invideo review is aimed at exposing these two contenders to see which one of them reigns supreme in the ever-evolving landscape of digital media.
As an intending content creator, or maybe you already are, captivating the minds of your audiences is your utmost priority. Pictory & Invideo are AI tools among several others that can revolutionize content creation, and how audiences consume and engage with content. Also, in the digital media creation space, Pictory & Invideo have become very popular players that content creators find intriguing. But the question is which of them reigns supreme?
This review takes a deep look into Pictory vs Invideo to find out what features or qualities stand out amongst them and how they both perform in visual storytelling.
Let’s get started.
Pictory Review
Firstly, Pictory provides a very vast repository of visually stunning galleries. You will find an endless array of captivating visuals with depth and meaning for any genre or industry, to help you curate captivating videos.
The Pictory platform sure has a robust commitment to storytelling. Photographers are able to share their content and have a community to exchange ideas, collaborate, and grow. With this, Pictory also is a constant source of inspiration for these content providers, and those who would use these media. The Pictory platform encourages exploration and discovery. As a user, you will find more than enough media with styles and perspectives for your own work. As you look through what Pictory has to offer, your imagination will be ignited with passion to create and deliver stunning and captivating visuals to your audiences.
Pictory also provides a very friendly UI/UX both on your PC’s browser and on your mobile device. The experience on both is seamless and enjoyable. You will find it easy to navigate, browse through the galleries, and find what you want. Let’s see the Pictory Graphical User Interface below.
How to use Pictory
This is the Pictory Graphical User Interface and it’s presented to you after you signup. As you see, you can create videos easily with any of the four options. Also, you can click on the watch tutorial link under each option to get to know the best tips for creating your content.
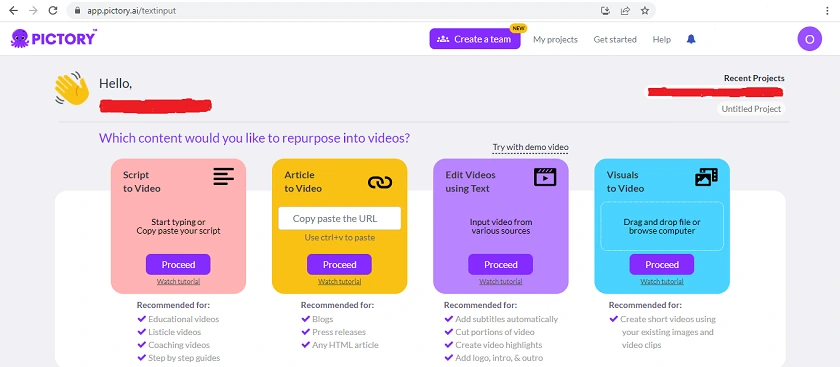
Pictory Script to Video
To get started with Pictory Script to Video, simply click on Proceed and you will be presented with the Script Editor where you can simply Paste your Script or Paste from Clipboard. Now, make sure to edit your script to ensure that the sentences per line are short. This is required so that the Captions that would be included in your video are not clumsy. Having done this, click on Proceed and you will find a library of templates to choose from. You will also see how the Captions would be shown on any template you select. So, choose accordingly and select an aspect ratio (16:9, 9:16, or 1:1). Next, your video will be generated as shown below.
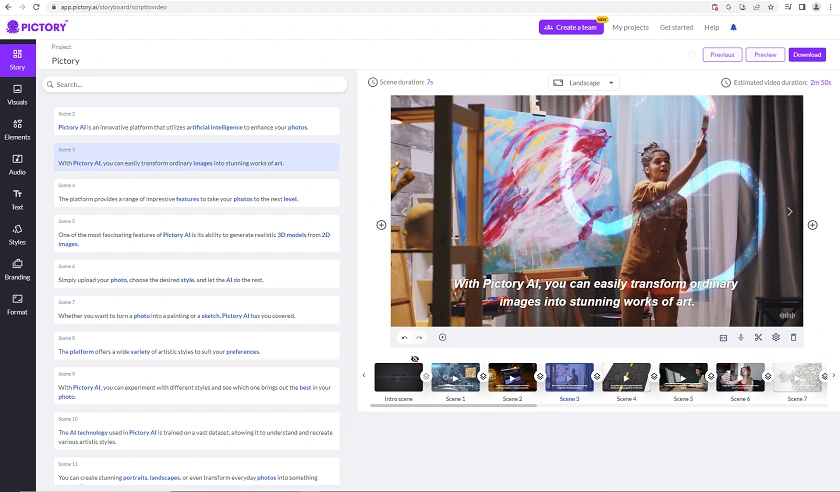
Having looked at the video that Pictory AI has produced, you may need to change some scenes if they do not align with the thoughts you intend to pass across. To do this, simply tap on the scene that should be changed, then click on Visuals on the top right-hand corner of the Dashboard, then on the Search Space, type whatever you want to search for. Also, as you change scenes, ensure to edit your Captions so that they stay uniform with other scenes. You can change the Font, Size, make Bold, Italicize, etc. and click on Apply to all. On your Pictory Dashboard, you will find Elements just below Visuals. This provides you with Emojis, GIFs, and Stickers. Furthermore, you may need to Link or Unlink Scenes on your Pictory-created video. Scenes with a Link simply mean that they have the same video clip. So, play around with these and move to the next stage which is Audio.
Under Elements on your Pictory Dashboard, you find Audio. You will observe that a Background Music has already been chosen for your Pictory created video. You can play around with the volume and change the music if you do not like it. Then, you have to add Voice-over. When you click on this, you will find different languages to choose from, Male or Female, the Speed, and several Pictory AI voices. To listen to these voices, just click on the Play Button that’s before the AI voice. Then also, you have the option to add your own background music, and your own voice-over into Pictory. It is worth mentioning that Pictory does a good job of synchronizing your uploaded voice-over with the entire Captions of the Script, just click on Entire Video.
Having done these, the next step is to download your Pictory-created video. But before doing this, ensure to Preview it, and go to the Format Tab on the Pictory Dashboard to first select your video resolution (720p or 1080p) and then proceed to Download your video. You will also find options to Download Spreadsheet of Social Video Posts, or Download Social Video Posts for Hootsuite. Finally, your Pictory-created video will be generated, and you also receive an email notification when this process is complete. Furthermore, your Pictory-created video will come with watermarks if you do not have a subscription. Also, Pictory gives you three free videos without a subscription, but these three still come with Pictory watermarks when you download them.
Pictory Pricing
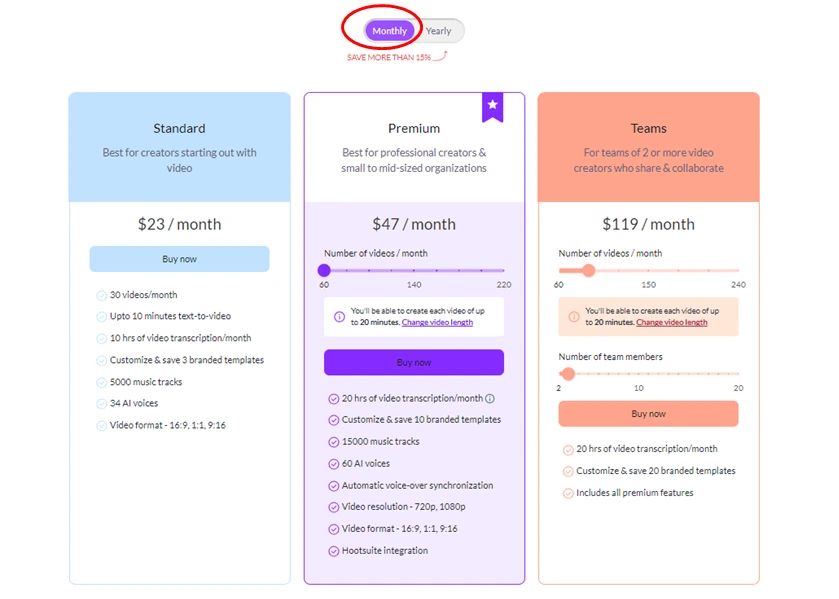
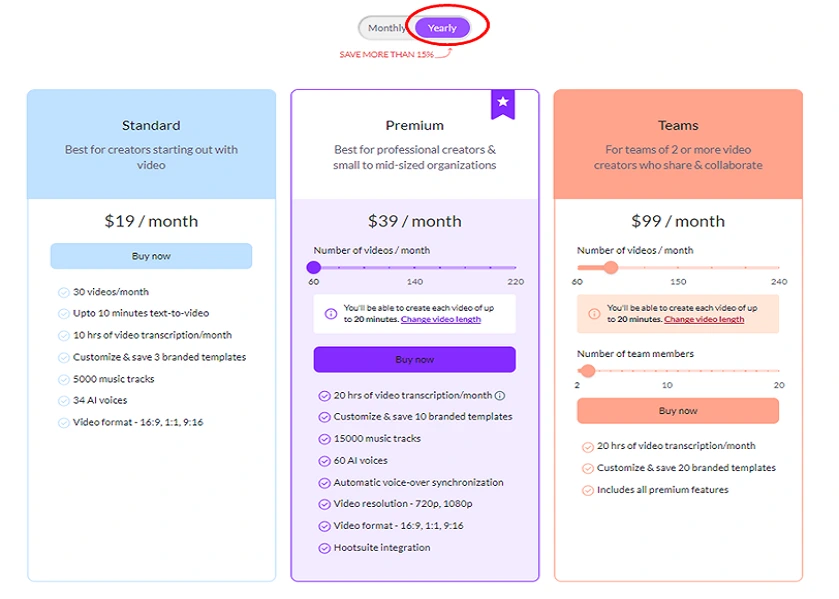
Pictory has a Standard Plan, a Premium Plan, and a Plan for Teams as shown below. (At the end of this review, find links to get a 20% discount on the lifetime of your Pictory Subscription).
Invideo Review
Obviously, Invideo is one of the several video editing and creation platforms available today. It is one that gives individuals the ability to create professional-looking videos in little or no time. Irrespective of the experience level of individuals, anyone can use Invideo to simplify video creation.
With Invideo, you can decide to build your videos from scratch and look through so many pre-designed templates and select what’s most appealing to you. You will find an extensive video library of templates, premium stock images and videos, that cater to instructional videos, social media, marketing, and several other industries. When you begin creating your video, you can enhance it with high-quality visuals and audio, apply transitions, merge video clips, trim video clips, use your own voice, tweak brightness and saturation, amongst other features.
With Invideo, you have a very simple drag-and-drop editor, with an intuitive and user-friendly interface. This makes creating your videos simple and quick. You also have aspect ratios to choose from, to aid the creation of YouTube videos, and for social media platforms like Instagram, Facebook, et cetera.
How to use Invideo
To get started with Invideo, simply signup (You do not need to input your credit card). After creating your account, you will be presented with a screen as shown below.
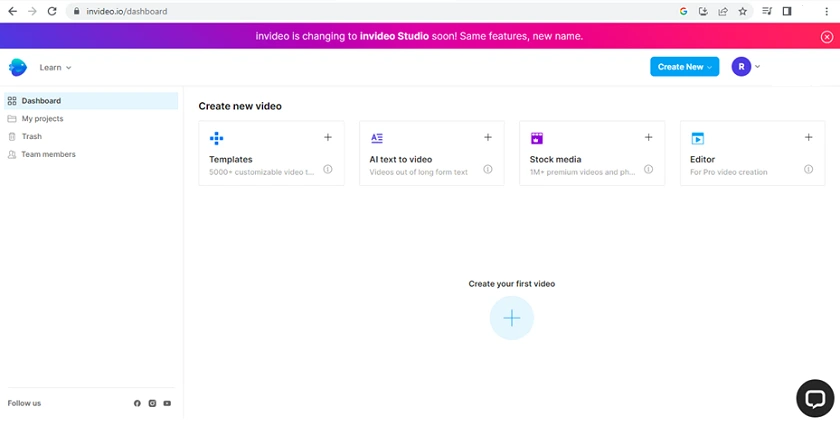
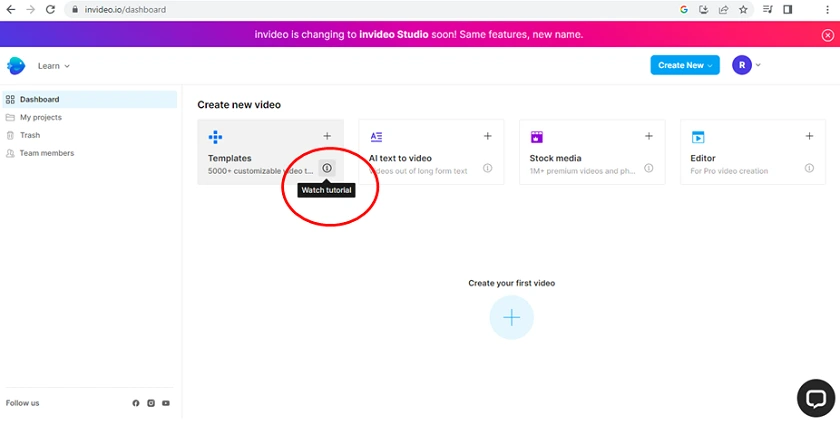
As a first-time user, you can watch short videos that enable you familiarize yourself with Invideo. Just hover your cursor towards Templates, AI Text to Video, Stock Media, and Editor as shown below.
Invideo Text to Video
To create your first video, you can simply click on ”create new” at the top or ”create your first video” below, and you will have the options to choose using Templates, AI Text to Video, Stock Media, and Editor. Or, just click on any of these four options showing right on the Dashboard.
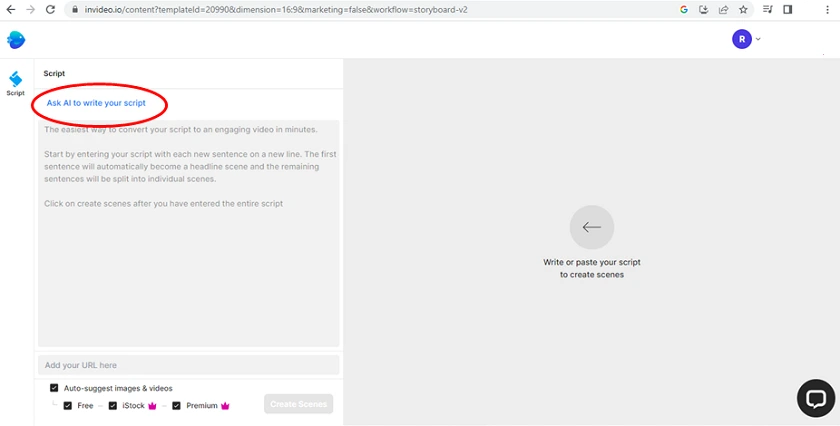
With the Invideo Text to Video feature, you can use the ”Ask AI to write your script” feature to generate your scripts or articles. Simply type in a word or sentence to describe what the script should be about, and it will be generated for you. Then also, you can use your own prepared script by just pasting it in the AI Text to Video field, click on Create Scenes and your video will be generated from Invideo’s stock library of video clips that match your script. If you aren’t satisfied with the clips that Invideo has added, you can replace them with more relevant footages by clicking on the Videos Tab located on the left-hand side of the Dashboard and searching for a relevant video. Furthermore, you have the option to Trim Video to Fit Scene when you’ve found a more appropriate video. Apart from the Invideo stock library of video clips, other options are available from Pexels, Pixabay, et cetera.
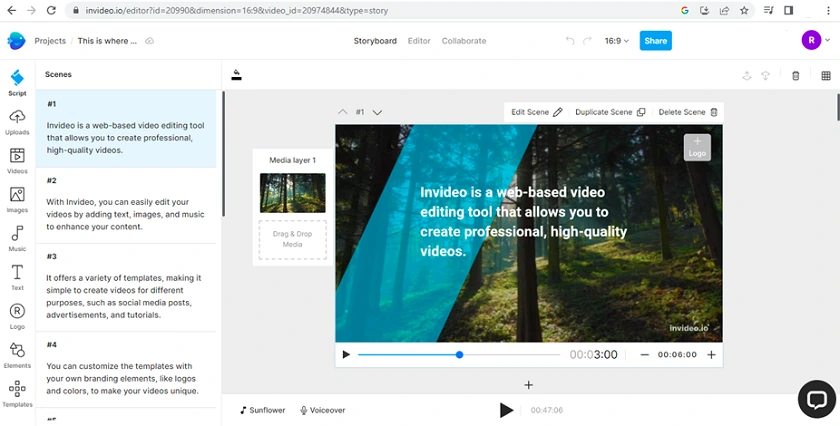
Once your videos for each scene are ready, you can also adjust the TEXT that’s displayed for each scene by clicking on the text, dragging around the edges to make it bigger or smaller, and using the Menu at the top of the Dashboard to change the font size, animation style, or add some more effects using the ”Text Effects” button.
The next thing to do is add Voice Over. You can use Invideo’s Automated Text-to-Speech Voice-Over feature or Record Your Own Voice. Below the video you’ve created, you will find the ”Voiceover” feature. Click on it and you will be presented with four options which are ”Automated text to speech, Import from uploads, Upload your VO file, and Record voice-over”. Speaking of recording your own voiceover, with Invideo, you can simply click on this option and begin to read your script and record it with your computer’s microphone conveniently. If you choose the Automated text-to-speech option, all you need to do is select your language of choice and the particular AI voice you want. Invideo will then create your chosen voice-over for all the scenes in your video, and balance the timing for each scene to match the voice-over.
Finally on this, you can choose to change the background music that Invideo already chose for you or leave it. Then, preview the video and if satisfied with it, click on the Export button to download it in either HD or Full HD.
Invideo Free Trial
It is worth mentioning that the Invideo Free Trial is one that enables you to access all features in Invideo such as 5000 + professional video templates, 8 Million + inbuilt stock media library, et cetera. However, the Invideo Free Trial does not allow you to download any video you create. Therefore, you need a subscription.
Invideo Pricing
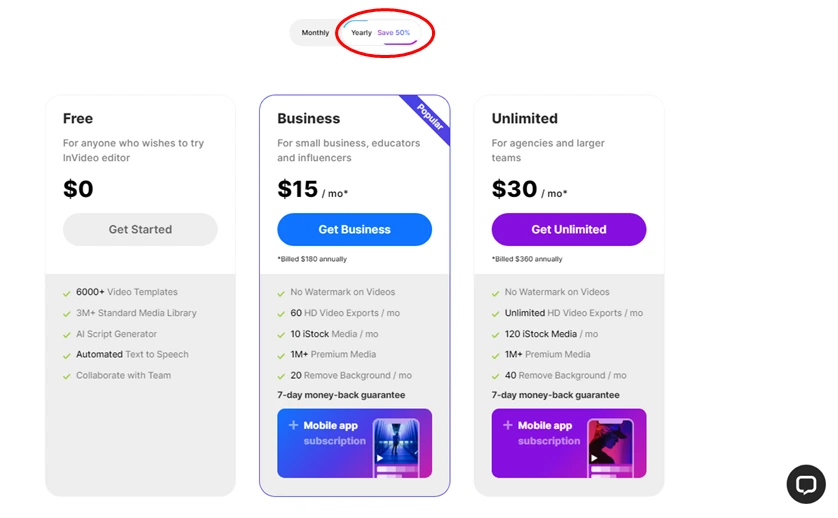
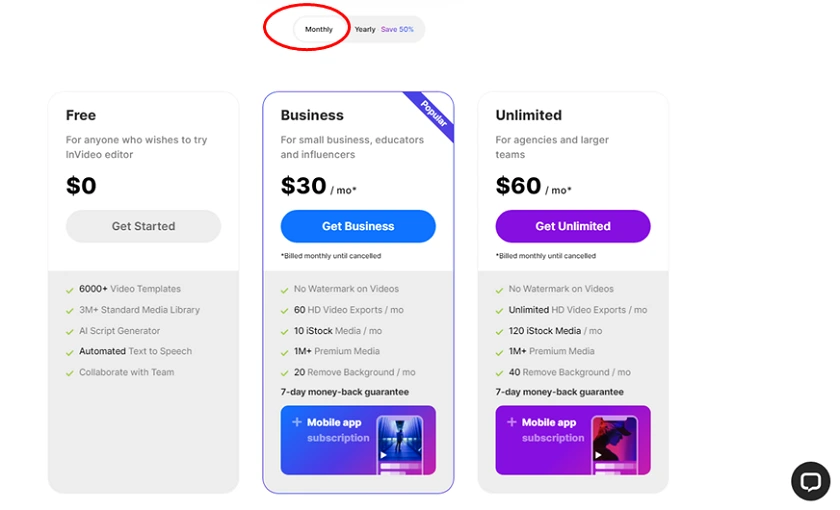
Invideo has three packages which are named Business, Unlimited, and Lifetime Business Plan. You can choose to subscribe Monthly or Yearly for either the Business or Unlimited packages but paying yearly saves you 50% as shown below. (At the end of this review, find links to save 25% on all Invideo plans).

Pictory Alternatives & Invideo Alternatives
As with every software or every gadget, some users will find them suitable for their needs, while some other persons may want something else. Now, for the most part, Pictory and Invideo are very suitable video creation and editing tools for beginners and experienced content creators. However, other tools are Adobe Premiere Pro, Adobe Spark, Filmora et cetera. As you consider these, as well as Pictory & Invideo, ensure to consider the complexities of the projects you would be working on. Also, user experience, features, and your budget are important considerations as well.
Final Thoughts on Pictory vs Invideo
Pictory & Invideo are excellent media creation tools with their own unique strengths. Both have a vast array of templates and library of stock footage. The major priorities of any content creator can be found in Pictory or Invideo such as advanced editing capabilities, a rich library of templates, an easy-to-use Dashboard, et cetera. However, Pictory has a functional mobile app but Invideo doesn’t have as at the time of writing.
Essentially, choosing between Pictory & Invideo is very much hinged on the type of media creation you will be involved in. You would have to take a deep look into the type of content you will be creating and the level of customization you need. In addition, you may consider how familiar you are with video editing tools (being a beginner or advanced creator) even though Pictory & Invideo are simple to use, with videos included in their Dashboards to get you started. Also, pricing is a consideration and both Pictory & Invideo have satisfactory features on their basic plans. Overall, both can magnify your video creation activities and ignite the passion you desire for your creativity.
Get Invideo and save 25% on all Plans using the code (SAVE25)
